Why?
Every once in a while I'll find a script being deployed and not knowing or remembering what's actually in that script. If it's someone else's, I have to find who created it and ask them for the script contents. If it's mine, I have to look in one of 50 spots that I stash scripts away. After a little while of doing that, I found out how to use DevTools and Graph Explorer to get the script content and decode the script content. Then I learned how to edit the scripts using Graph Explorer. This is all great but it's still a handful of hoops to jump through. And since I was craving some Power Apps, I figured making this process in a simple app would be a fun project.How?
There are four parts to making this app function. The app, two Power Automates, and a custom connector. The custom connector will need an App Registration in Azure with the proper Graph API permissions applied to it so that's where we'll start. Please make sure that you are not using any production scripts during any of the testing procedures.Building the Custom Connector
If you're already familiar with App registrations and Graph permissions, you can skip ahead to Custom Connector. Just create one with "DeviceManagementConfiguration.ReadWrite.All" permissions.App Registration
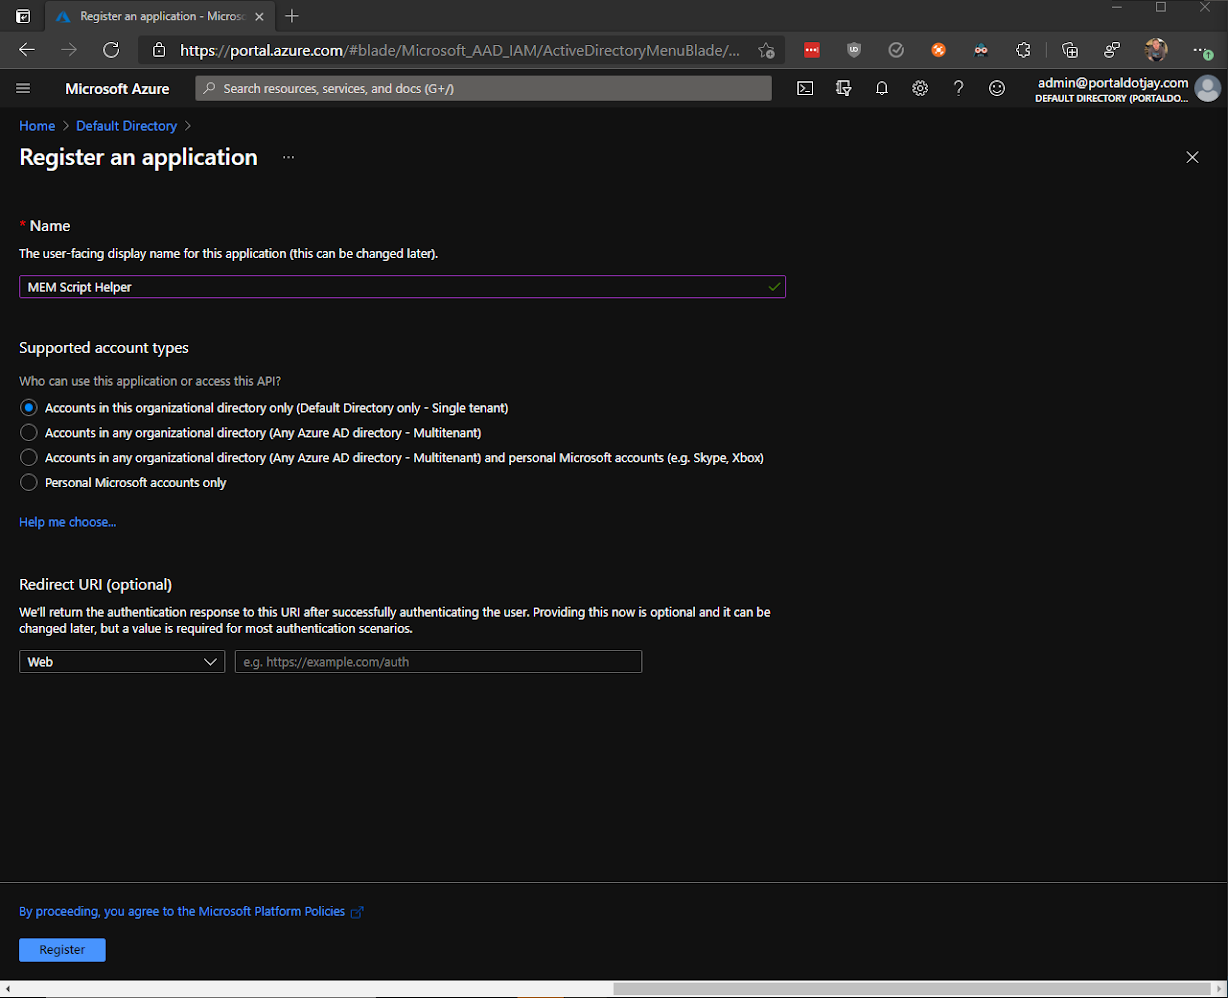
Go to Azure AD, click on "App registrations", then "New registration". I use the actual app name here but you can choose anything. Leave the other settings alone for now and click "Register".
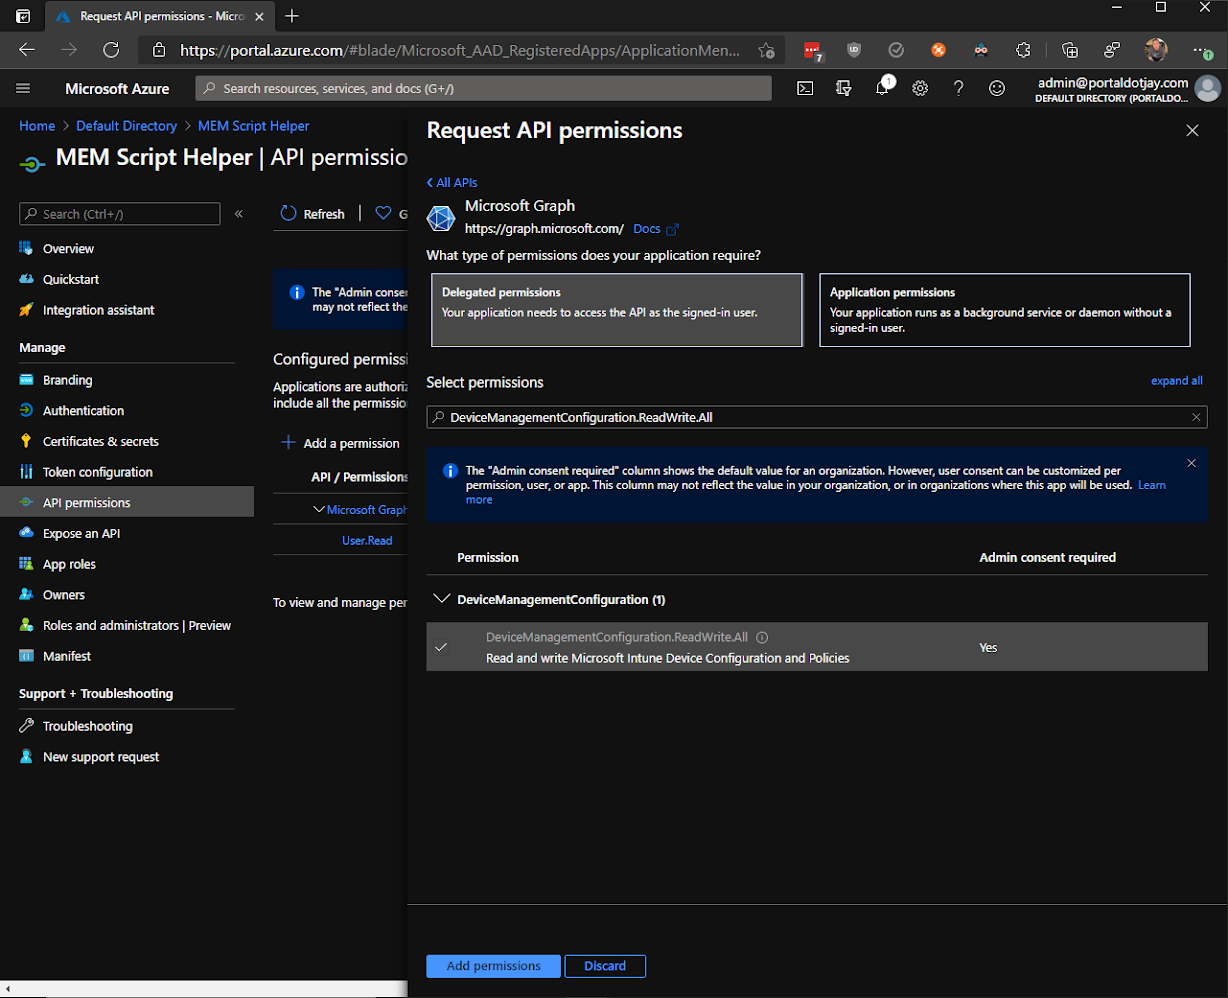
The next step will be adding the Graph permissions to the app. Click on "API permissions", "Add a permission", and "Microsoft Graph". For our purpose, we're going to use Delegated permissions. All of the permissions available for Graph should now be visible but we'll only need "DeviceManagementConfiguration.ReadWrite.All". Once you've added the permission, you'll need to also grant admin consent by clicking on the "Grant admin consent for DirectoryName".
Now we'll need to create a secret for the connector to use when requesting a token. Click on "Certificates & secrets" and "New client secret". You can choose the next details to your liking but I'm going to use "MEM Script Helper Connector" for the description and leave it set for 1 year. Once you click "Add", your secret will only be visible for a short time so be sure to make a record of it somewhere.

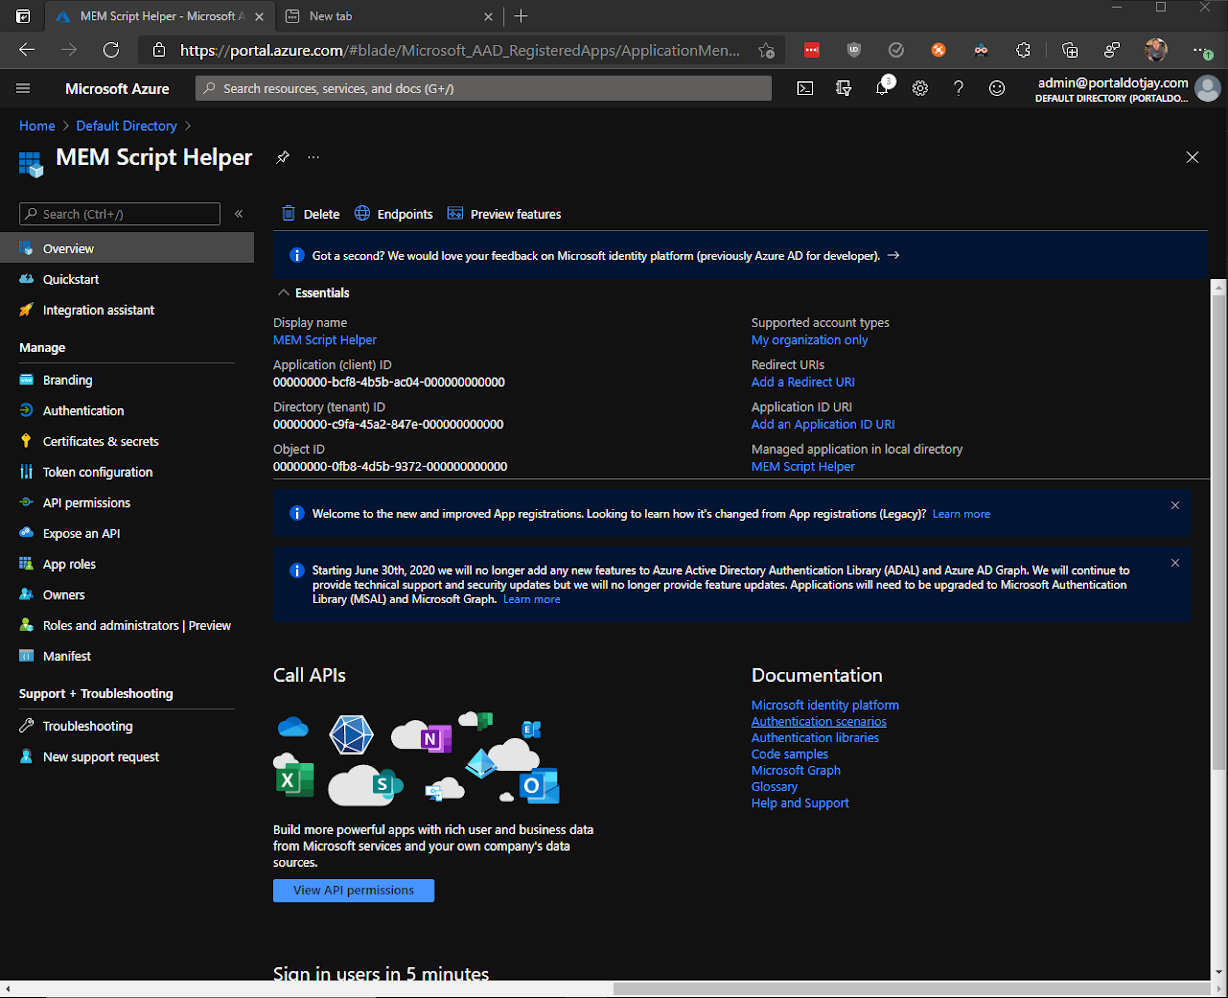
We'll want to copy one more thing (you are using clipboard history, right? Win+V) before we create the Custom Connector. In the Overview blade, copy the Application ID. Now that we have the client ID and the client secret, we're ready to head over to Power Apps to make the connector.
Custom Connector
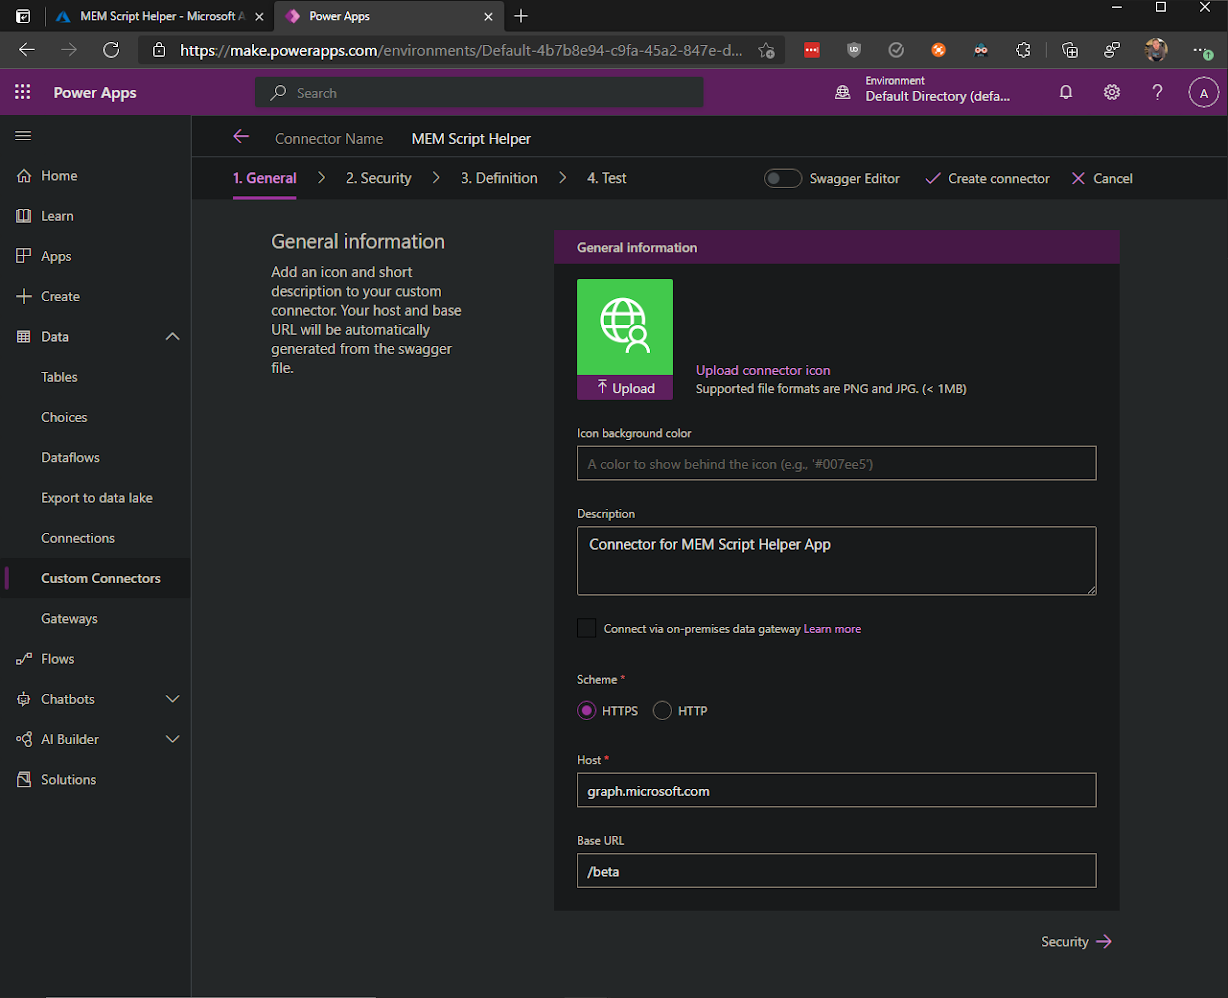
In Power Apps, navigate to Custom Connectors and click "New custom connector". I'm naming mine MEM Script Helper and adding a simple description. You can include an icon and background color if you choose. Leave "HTTPS" selected for the scheme and add "graph.microsoft.com" as the Host and "/beta" as the Base URL.
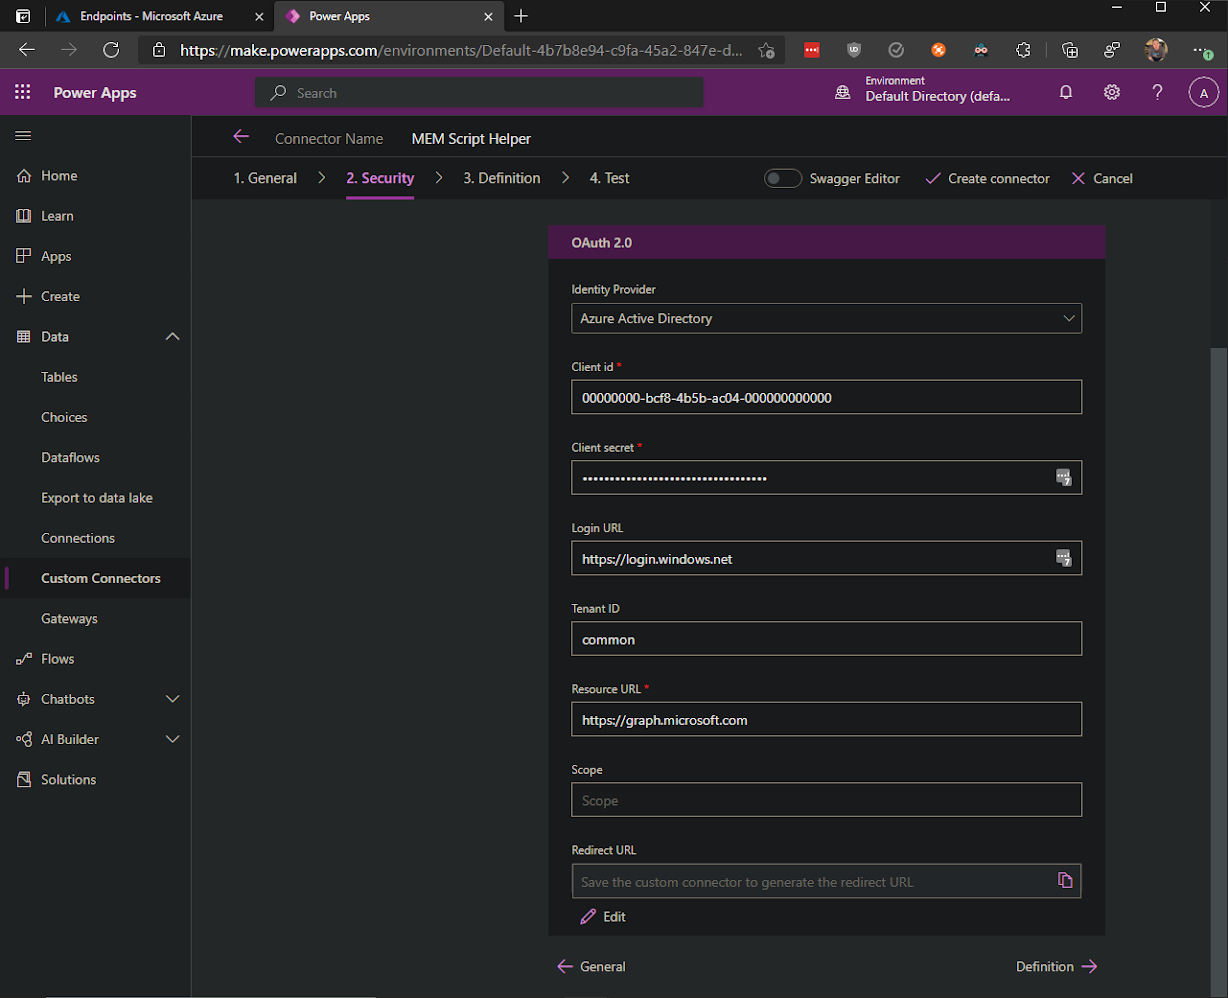
In the Security pane, choose OAuth 2.0 as the authentication type and Azure Active Directory as the Identity Provider. Paste in your Client id and Client secret. Use "https://graph.microsoft.com" as the Resource URL and continue to Definition.
Now we'll be creating the requests to collect our data. We'll need three requests for our purposes. One to list all the scripts, one to get a single script, and one to update the scripts.
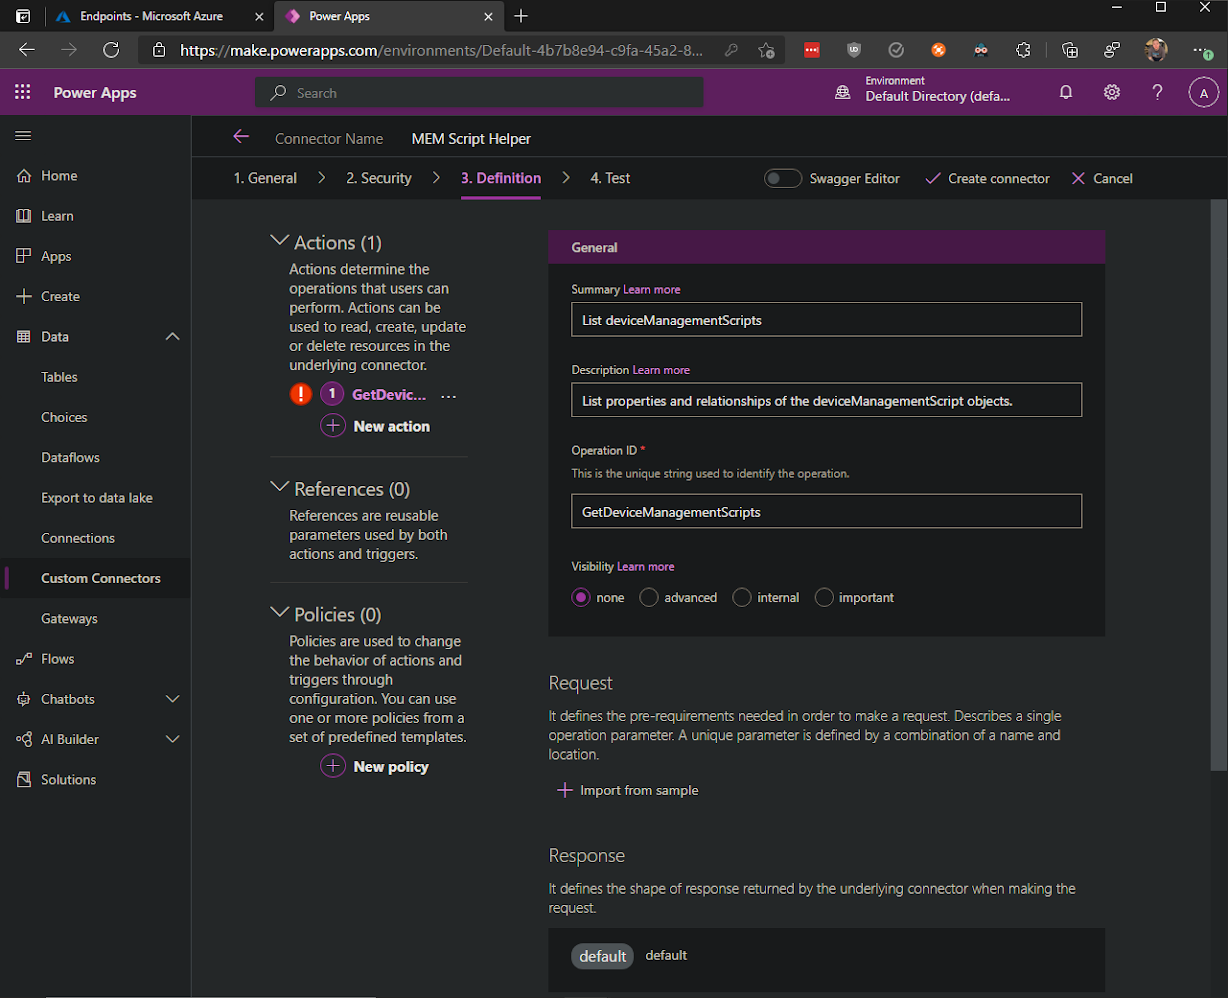
Click on "New action". For Summary and Description, I use the title and description from the Graph docs. In this case it's "List deviceManagementScripts" and "List properties and relationships of the deviceManagementScript objects." For the operationID, I use the request method, "Get", followed by the resource name, "deviceManagementScripts", but all that's really important here is that they are unique strings.
Now we'll use Graph Explorer to get the sample request to import for our next step.
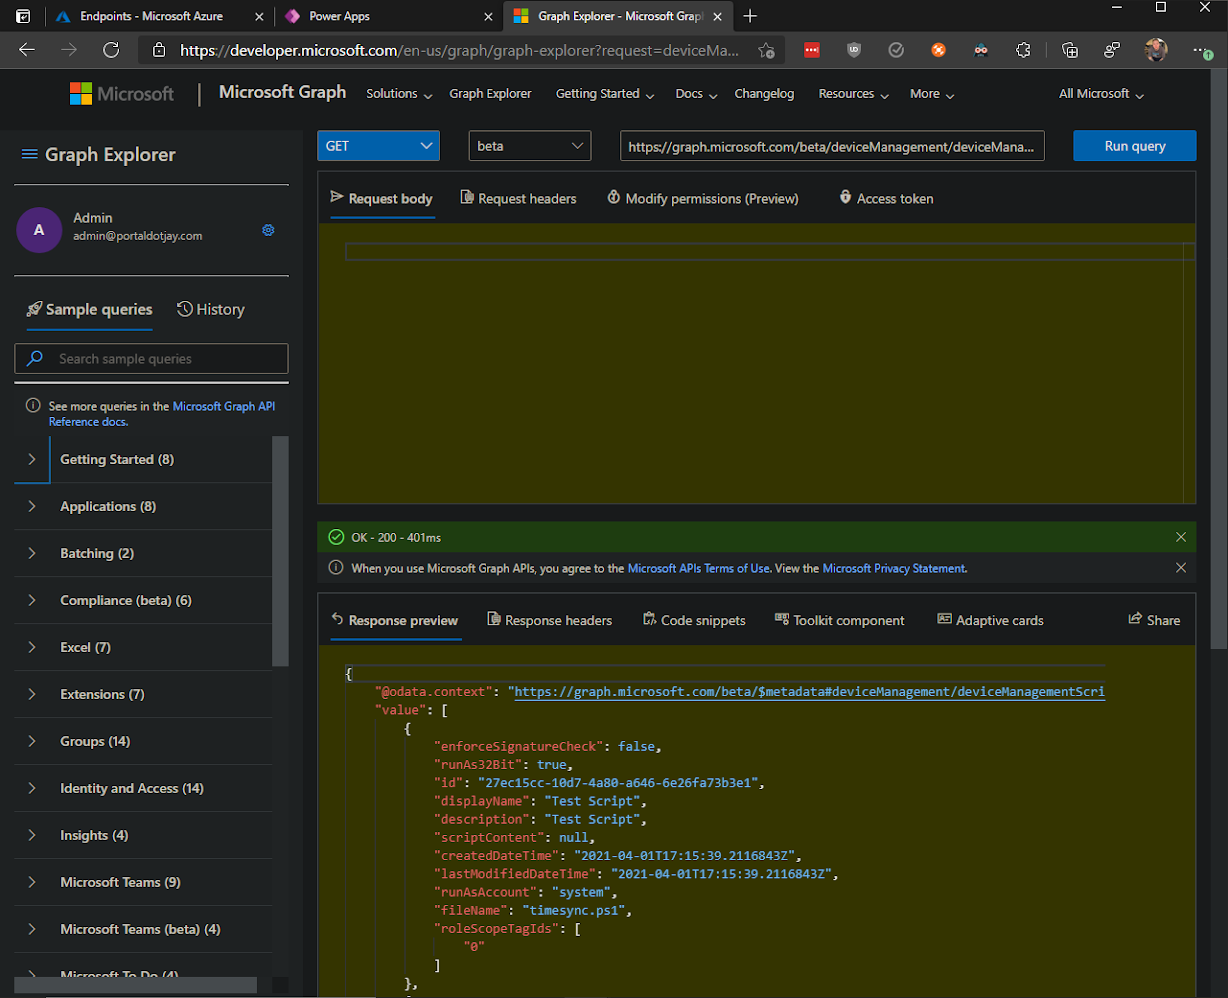
Sign in to Graph Explorer and select beta as the version, enter "https://graph.microsoft.com/beta/deviceManagement/deviceManagementScripts" in the text field, and click Run query. If successful, you should get a response code of "OK - 200" along with a list of the scripts in your tenant in the Response preview field. Copy everything returned in that response.
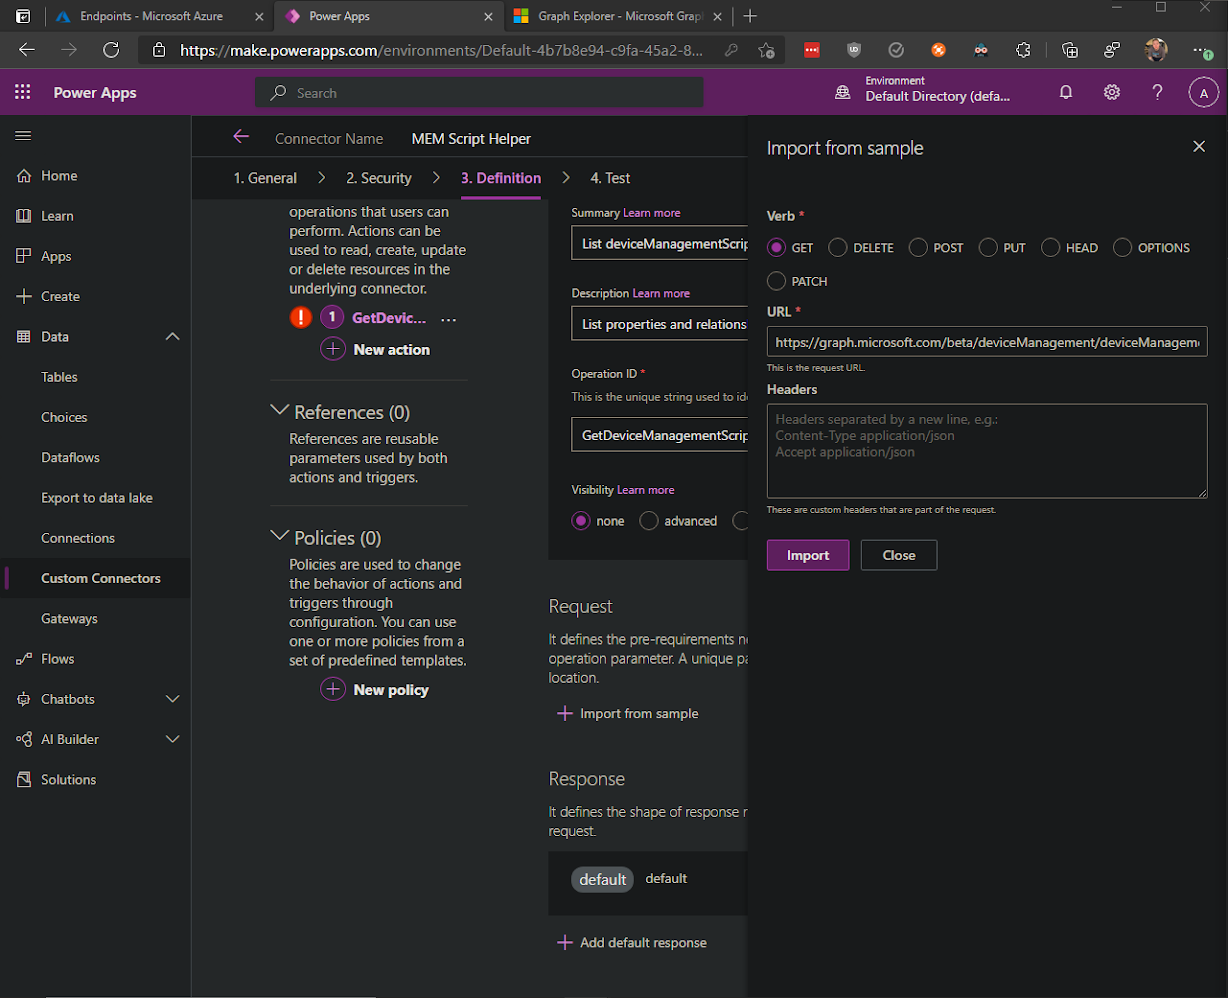
Now go back to Power Apps and click "Import from sample". Select "GET", enter "https://graph.microsoft.com/beta/deviceManagement/deviceManagementScripts" for the URL and click import.
Next we'll modify the existing Response by clicking on the default entry. I like to change the name to match the response code we're expecting which is "200". This is helpful for when you're expecting more responses than just one but we're going to keep things simple for now. Click on "Import from sample" and paste in the response the we copied from Graph Explorer, and click "Import".
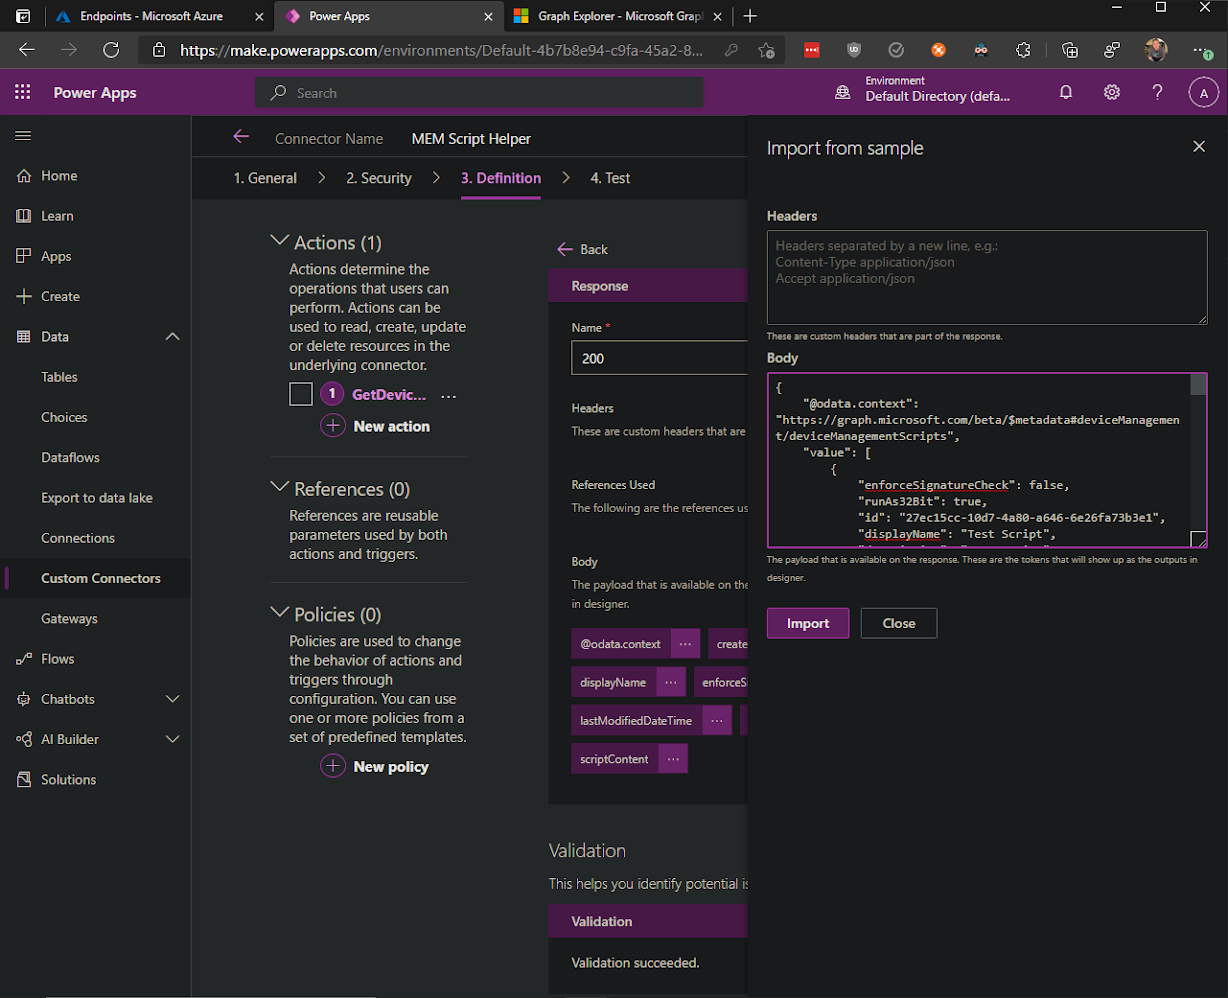
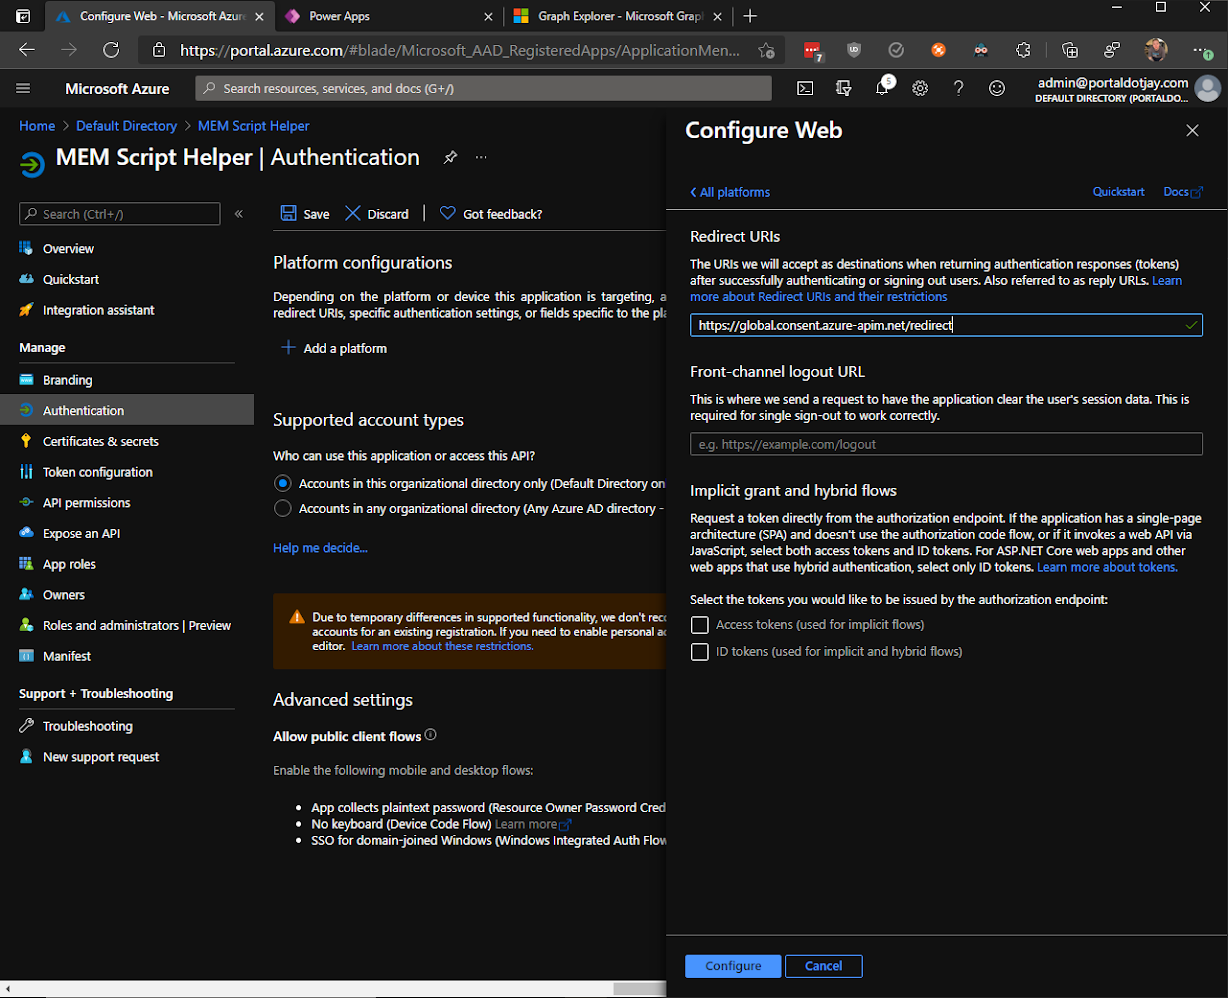
You'll now see the different properties that get returned in the body. Now that we have our authentication configured and one request built, it's a good time to select "Create connector" so we can test that everything is working as intended. Once the connector is created, go back to the security tab and copy the Redirect URL which is always "https://global.consent.azure-apim.net/redirect" but isn't shown until the connector is created.
Go back to your app registration, open the Authentication blade, and select "Add a platform". Choose "Web", paste "https://global.consent.azure-apim.net/redirect" in the redirect URI field, and click "Configure".
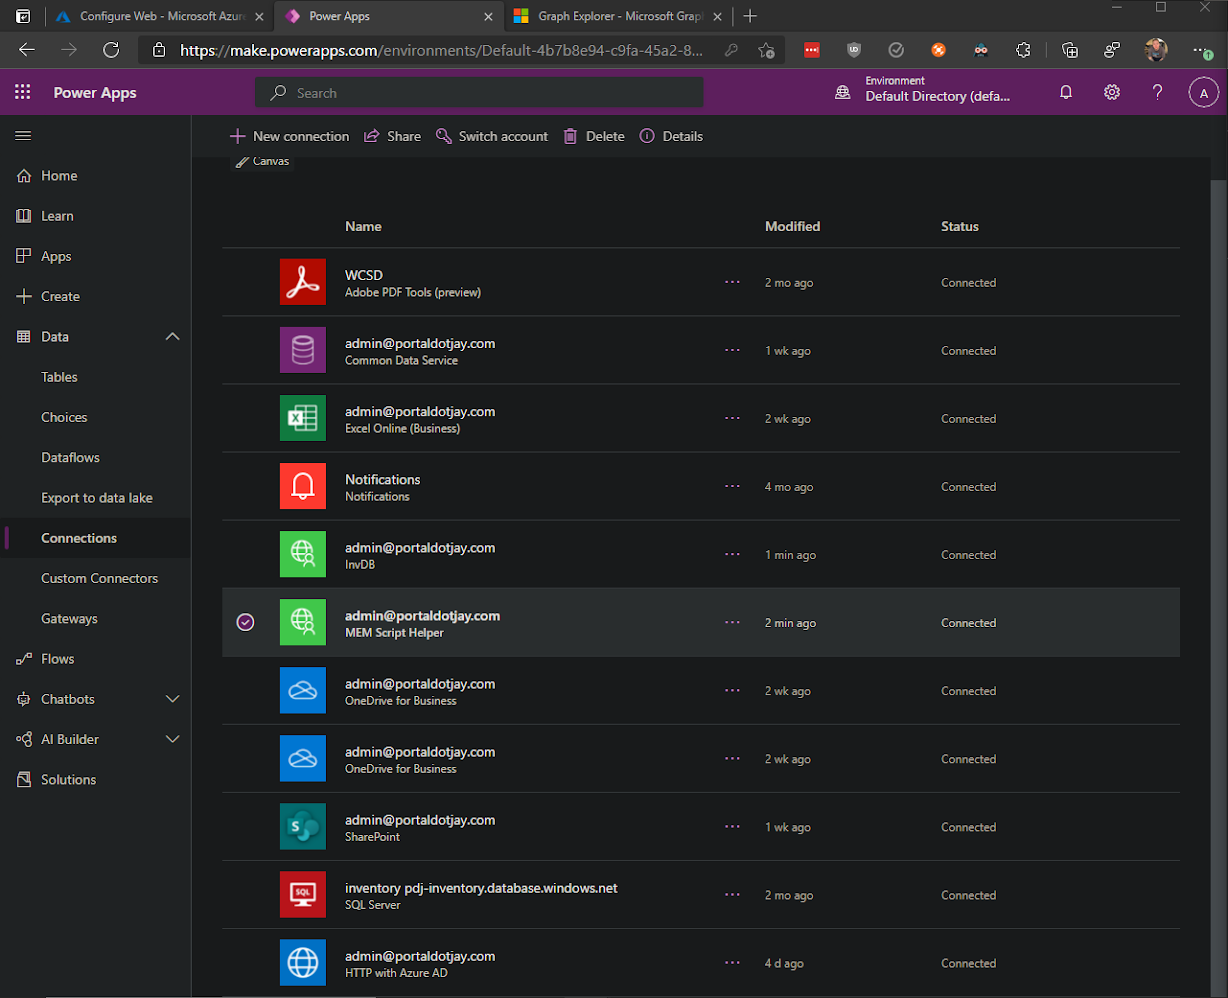
Now head back to Power Apps and click on the Test tab. Click on "New connection", "Create", and sign in. Annoyingly, this will kick us out of the connector and into the connections blade of Power Apps. But if we did everything correctly, you'll see the connection we just made with a "Connected" status.
Now let's go back to our connector and test the request. In the Test tab of our connector, you should see our connection that was created, and we can test the operation. If successful, we'll see a green check next to the operation along with a status code of 200 and our scripts in the response.
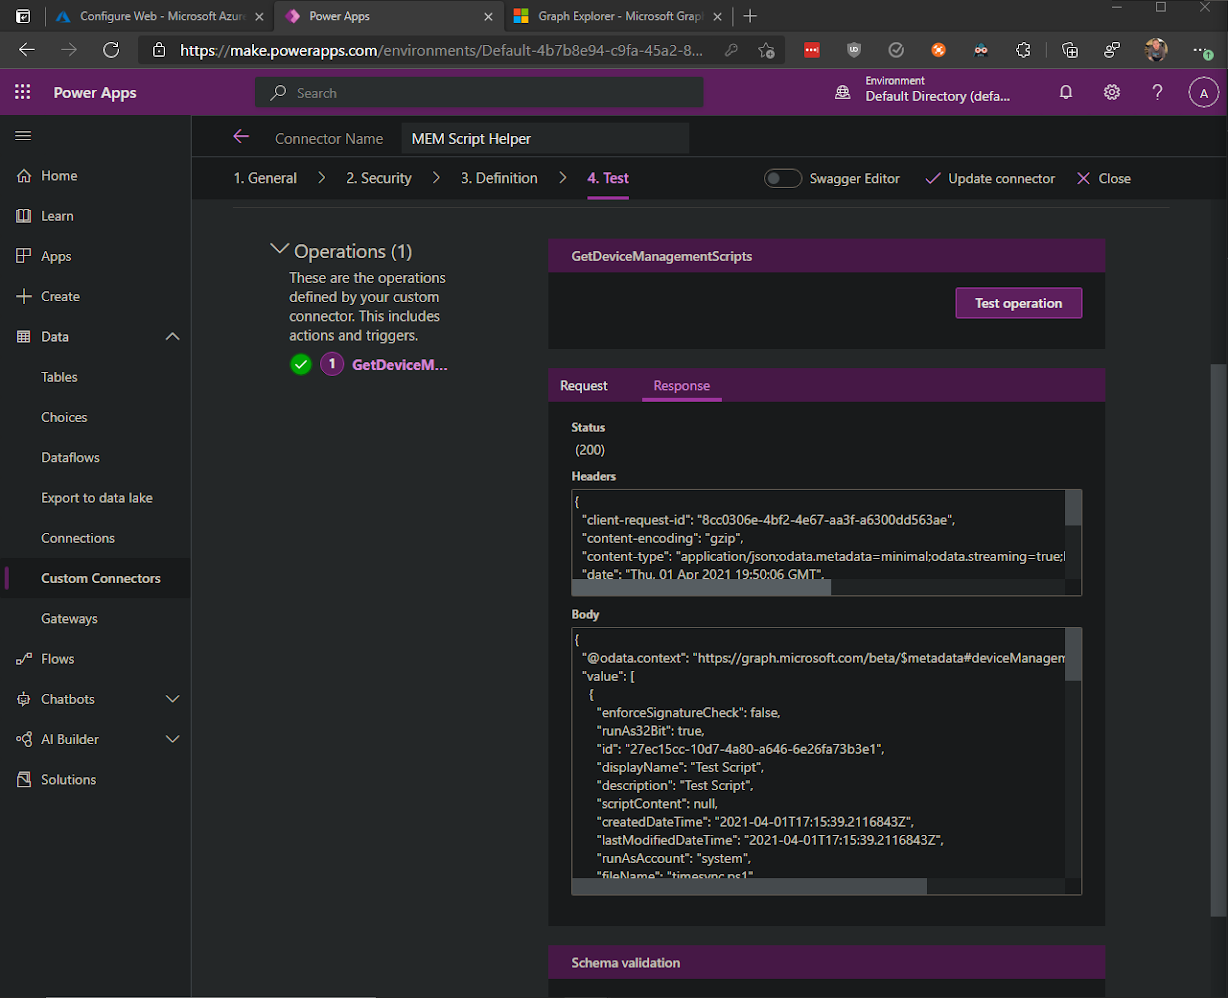
You'll notice that the scriptContent property contains a null value. I'm thinking that this is a bug but this is why we can't only use this response and have to also get the individual scripts to return the content.
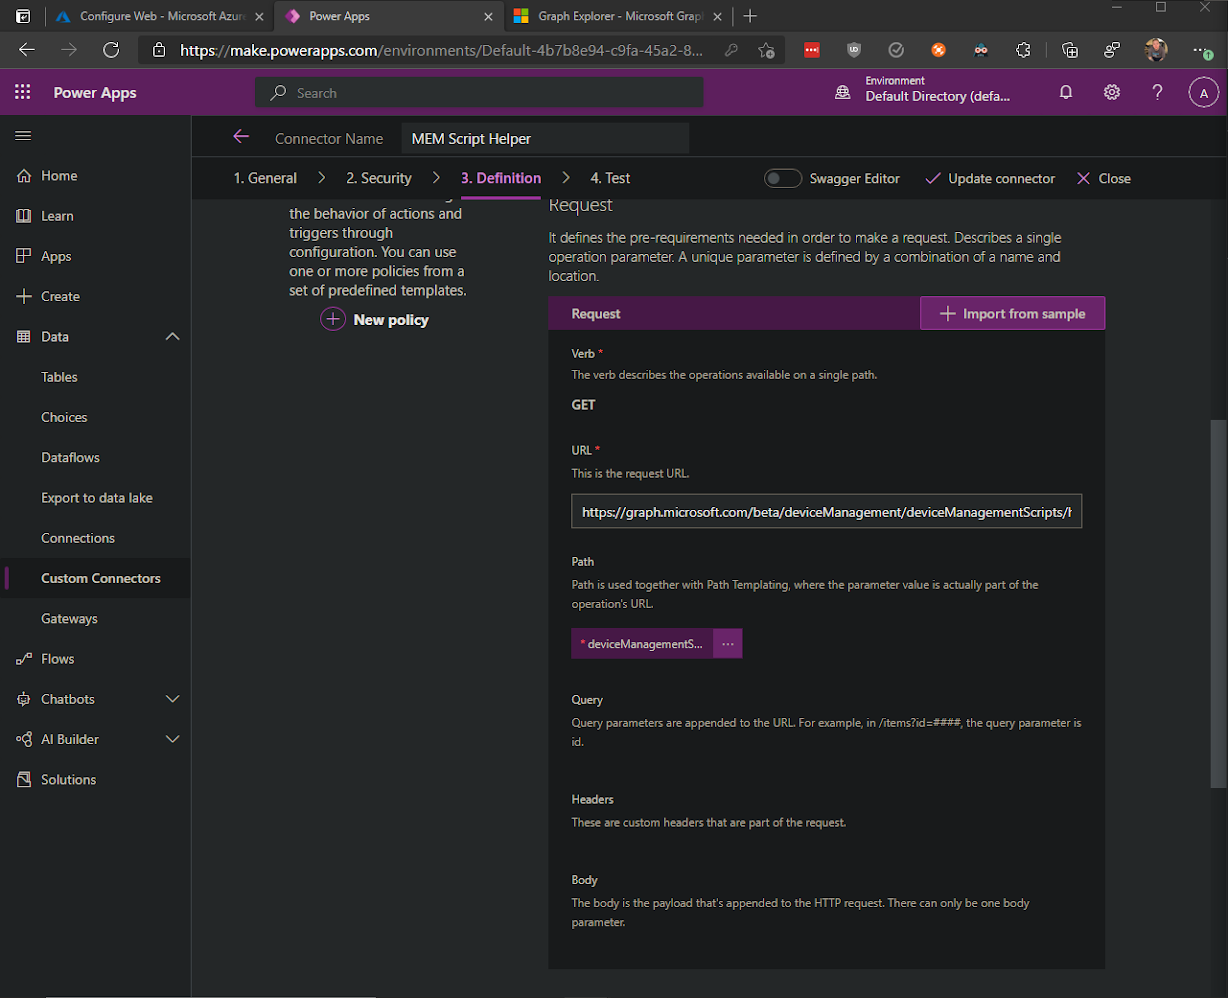
Now that we know everything has been set up correctly, we can make our next two requests. Go back to the Definition tab and create a new action. I'm using "Get deviceManagementScript", "Read properties and relationships of the deviceManagementScript object.", and "GetDeviceManagementScript" for Summary, Description, and Operation ID respectively. Select "Import from sample" as we did before and select "GET" and use "https://graph.microsoft.com/beta/deviceManagement/deviceManagementScripts/{deviceManagementScriptId}" as the URL and Import. This will create a request with a path parameter. You can think of parameters as variables that act as a placeholder for data that will be sent with the request.
Just as we did before, go to Graph Explorer and make a GET request to https://graph.microsoft.com/beta/deviceManagement/deviceManagementScripts/{deviceManagementScriptId} where {deviceManagementScriptId} is the id from any script. Copy the response preview (notice the scriptContent property no longer has a null value), go back to Power Apps, select the default response, change the name to 200, select import from sample, paste the text copied from Explorer, and select Import.
The final request we'll be creating is the one for updating the script. Create a new action using "Update deviceManagementScript", "Update the properties of a deviceManagementScript object.", and "UpdateDeviceManagementScript" for Summary, Description, and Operation ID just like before but the next couple of steps are a little bit different than before.
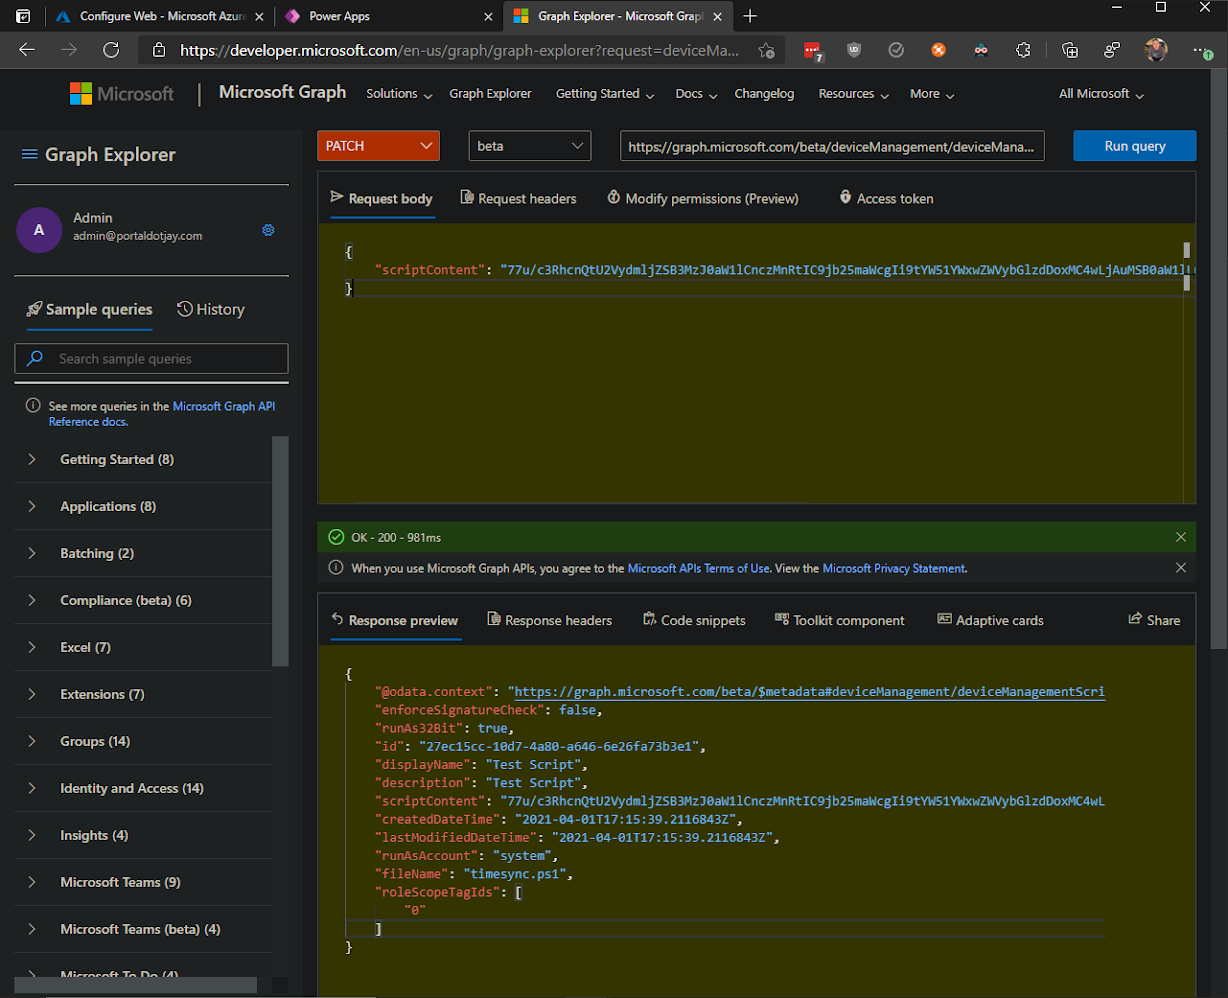
Go back to Graph Explorer and change the request method to "PATCH". Use caution as we're not just reading data but are making real changes. You should still have the previous response preview available. Copy the entire scriptContent line and paste it into the Request body. Make it valid JSON by deleting the comma from the end and wrapping the entire line in {} to end up with something like {"scriptContent": "scriptContentEncodedInBase64"}. Now run the query and if successful, you should again get a "OK - 200" status code and the script details in the response preview. Copy the request body and the response preview and go back to Power Apps.
As before, select Import from sample, enter "https://graph.microsoft.com/beta/deviceManagement/deviceManagementScripts/{deviceManagementScriptId}" as the URL, but choose "PATCH" as the verb this time and paste the value that was copied from the request body in Graph Explorer in the Body field and select Import.
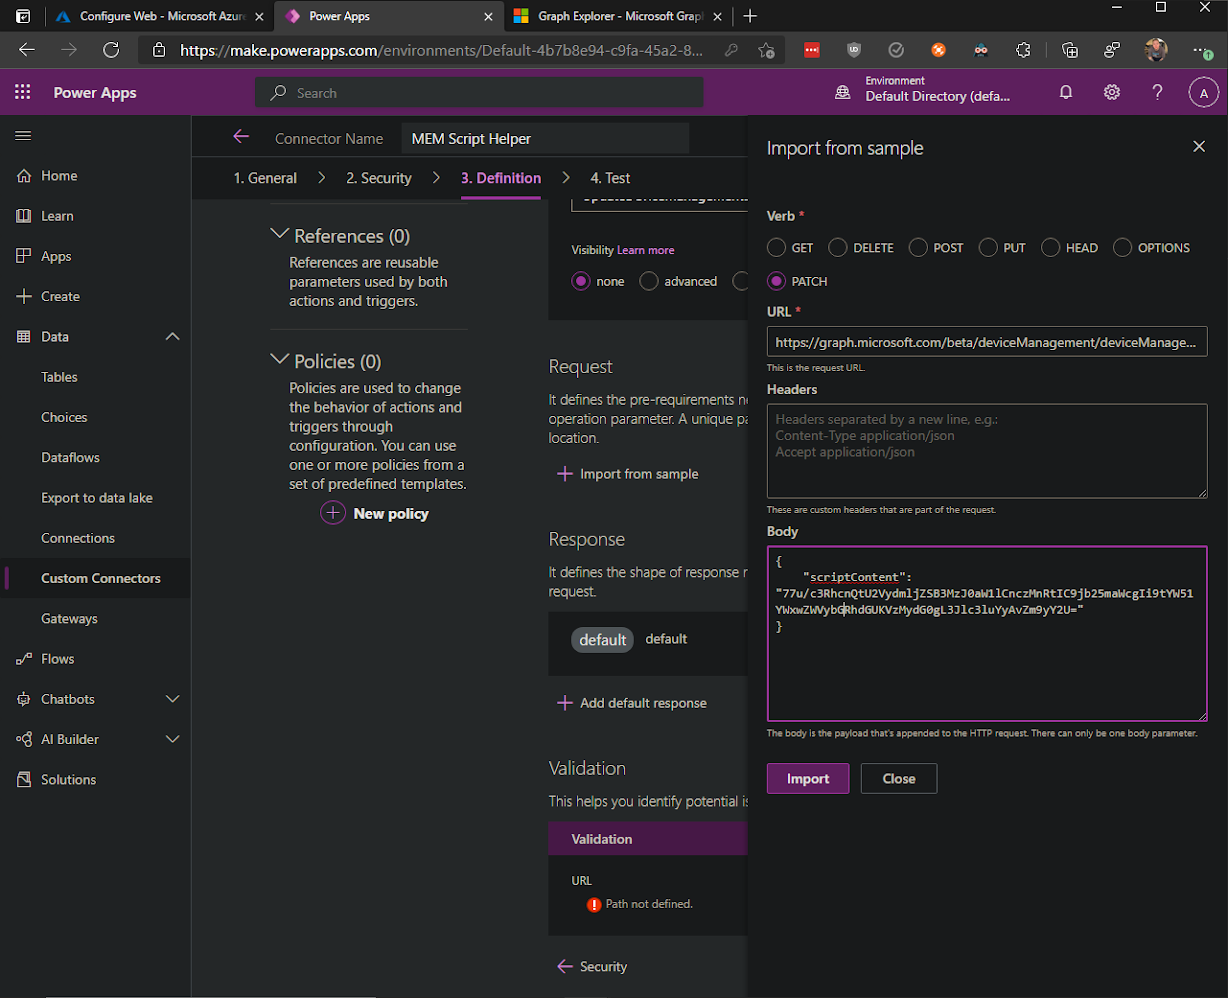
This time, along with the path parameter, you'll see that we also have a body parameter. Click it and select edit, and make it required. We'll also want to do the same thing for the "scriptContent" parameter. As usual, we'll want to change the default response name to "200" and import from sample using the copied value from Response preview in Graph Explorer.
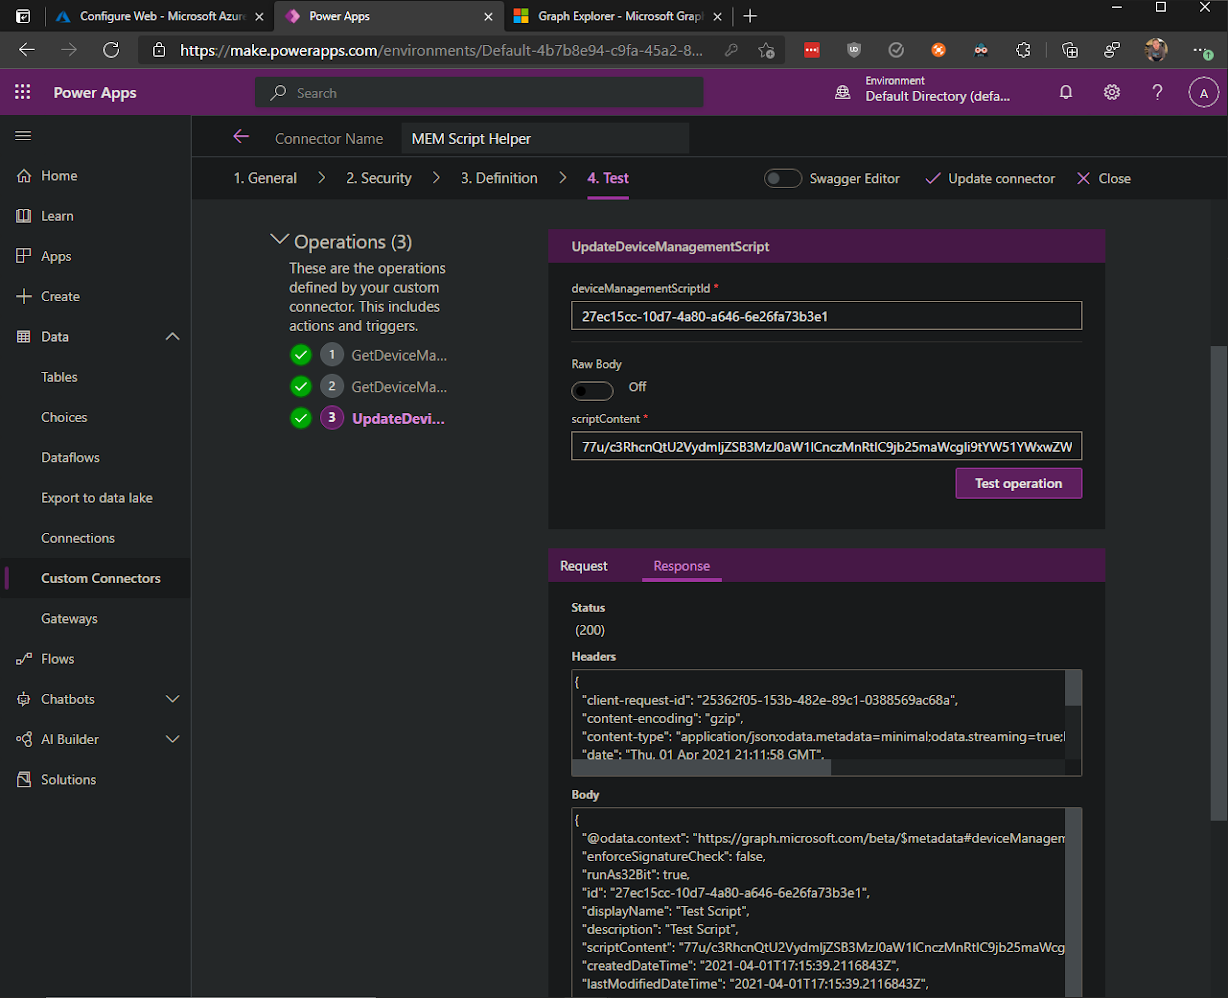
We now have all the actions built so now we'll want to update the connector so we can test them to make sure they are working correctly. I like to test the first one, copy an ID from the response, use that as the input in the second test, then copy the response value of the scriptContent property to use for the scriptContent in the Update test. If everything was successful, you should have three green checks. That's the hardest part done and we're ready to move on to building the Power Automate portion.
Power Automate
As I'm sure you noticed by now, the script content that get's returned doesn't look anything like a PowerShell script. That's because the scripts get encoded to Base64 when they are uploaded to Graph. Because of that, we need to use Power Automate as our middle man to decode the script content and then encode it before getting uploaded back into Graph.
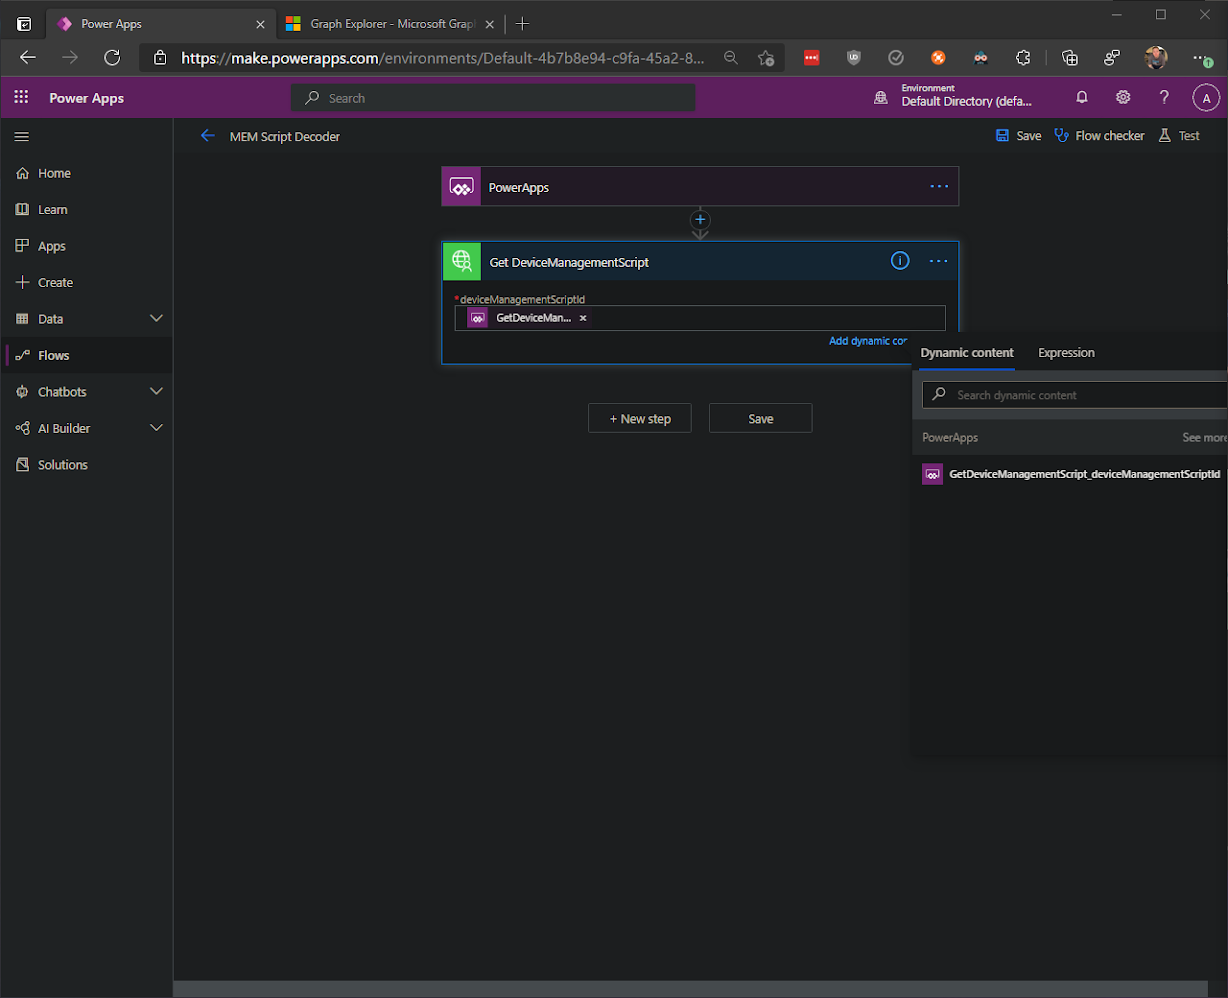
Go to the Flows blade and select "New flow", "Instant cloud flow", name it "MEM Script Decoder", select "PowerApps" as the trigger, and click Create. You'll see that the first step is already created for you so we'll need to create a new step. Under the Custom tab, select the "MEM Script Helper" connector and then the "GetDeviceManagementScript" action.
Click in the deviceManagementScriptId field so the Dynamic content window opens and select "Ask in PowerApps". Take note of the name of that's entered there as we will need it when building the app.
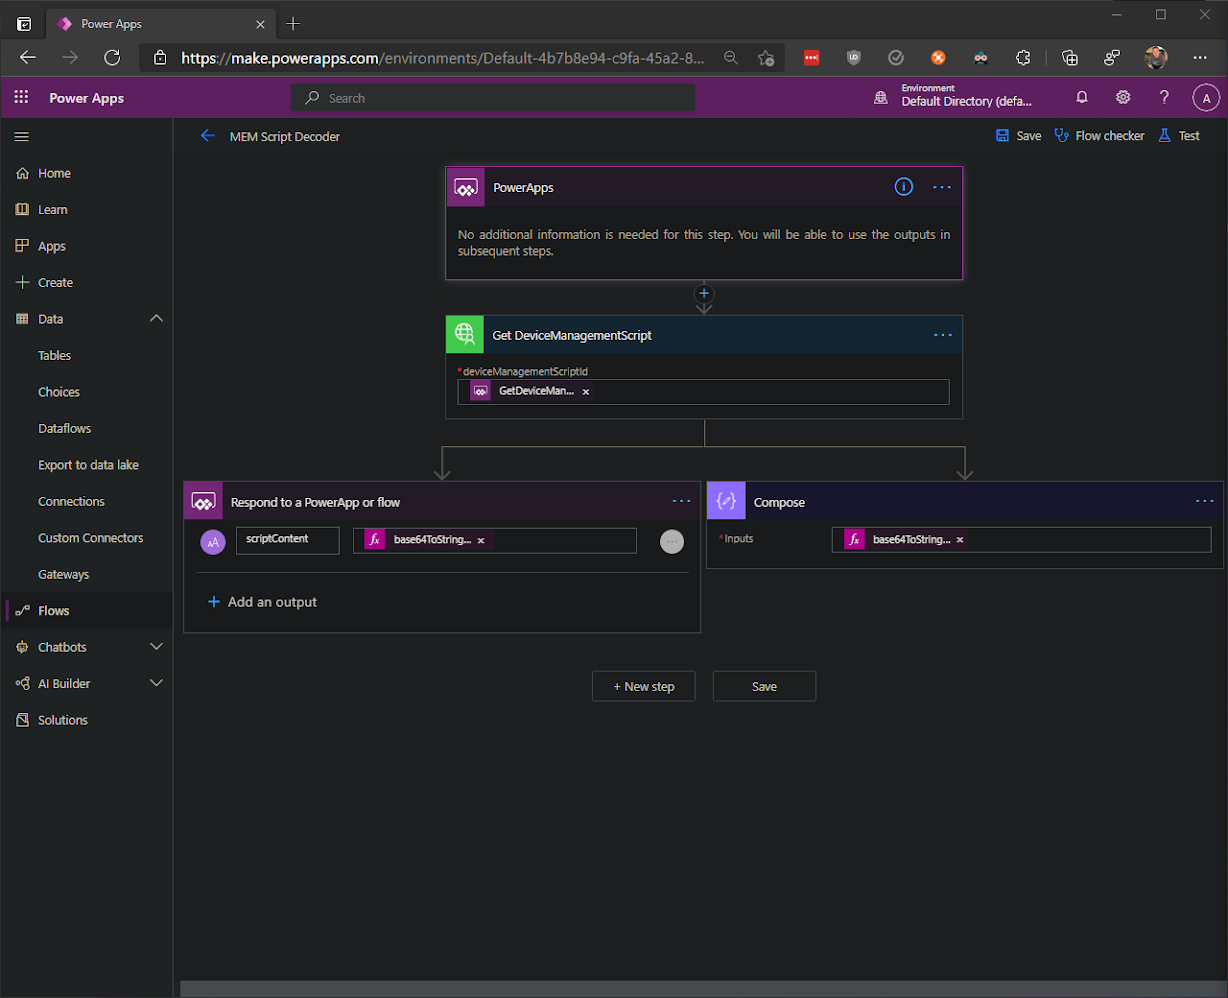
Add a new step, search for "Respond", select "Respond to a PowerApp or flow", and add an output. Select "Text" as the type of output and make the title "scriptContent". Now we'll need to use an "Expression" to convert the Base64 to a string.
Click in the value to respond filed to open the Dynamic content window and go to the Expression tab. In the function field, enter "base64ToString()". Now go back to the Dynamic content tab, and place your curser between the parenthesis, click on "scriptContent", and then "Ok". The resulting function should be "base64ToString(outputs('Get_DeviceManagementScript')?['body/scriptContent']).
For testing purposes, let's add an extra step to show the output just to make sure it's working. Move your mouse in-between the second and third steps to insert a new step and select "Add a parallel branch". Search for "compose", and add the data operation compose. Enter the same thing in input as you did in "Respond to PowerApp or flow". We can now save and test.
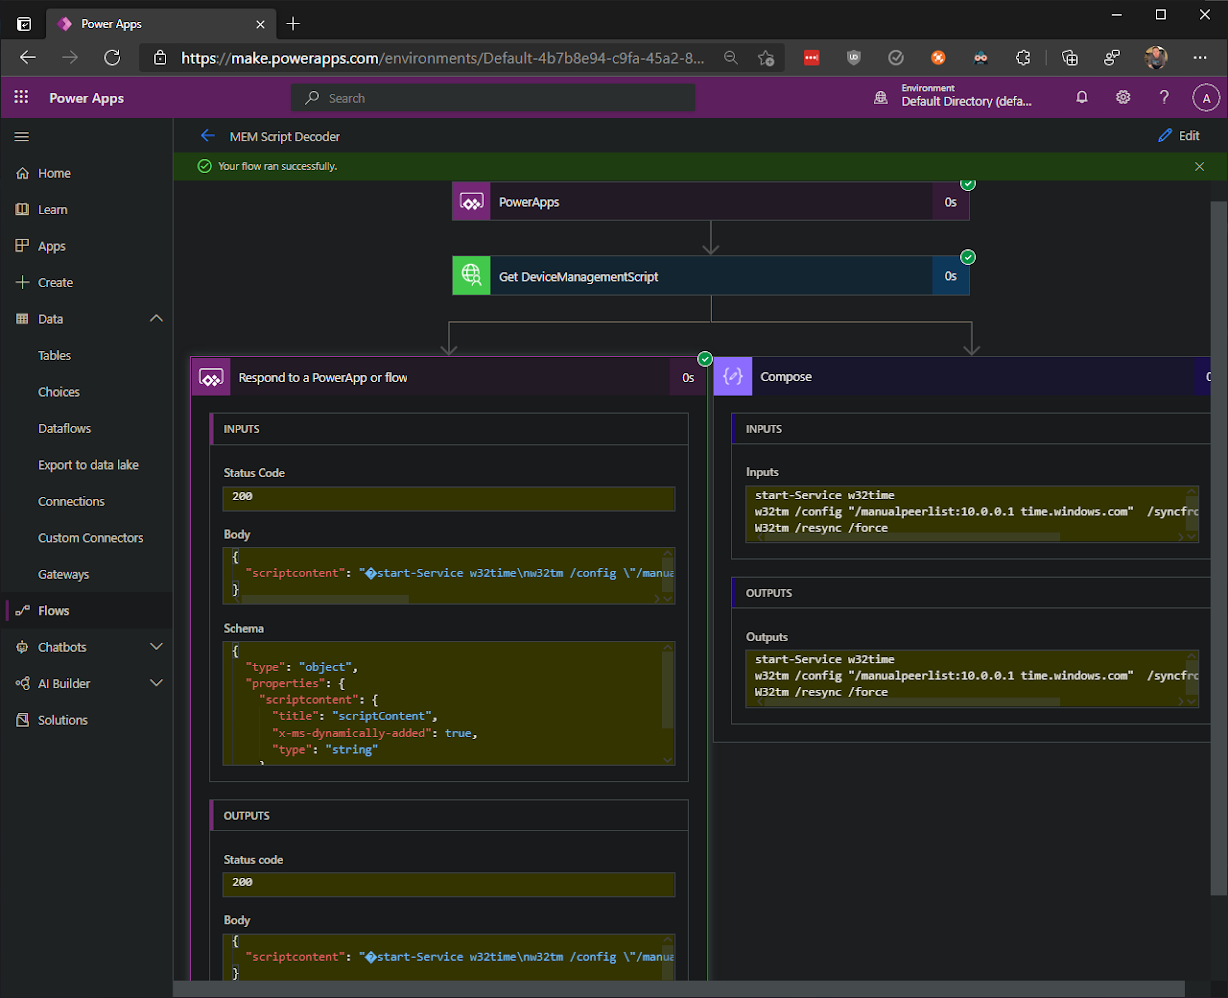
In the Test blade, select "Manually" and click "Test". At the Sign in page, select "Continue". Now paste the id of one of scripts you'd like to decode and select "Run flow". If we did everything correctly, we should get a "Your flow ran successfully" status message and can view the results. As you can see, the script content is decoded to readable text. We can now edit the flow to remove the compose step since that was just for testing.
Now we need to create what is essentially the reverse of this flow.
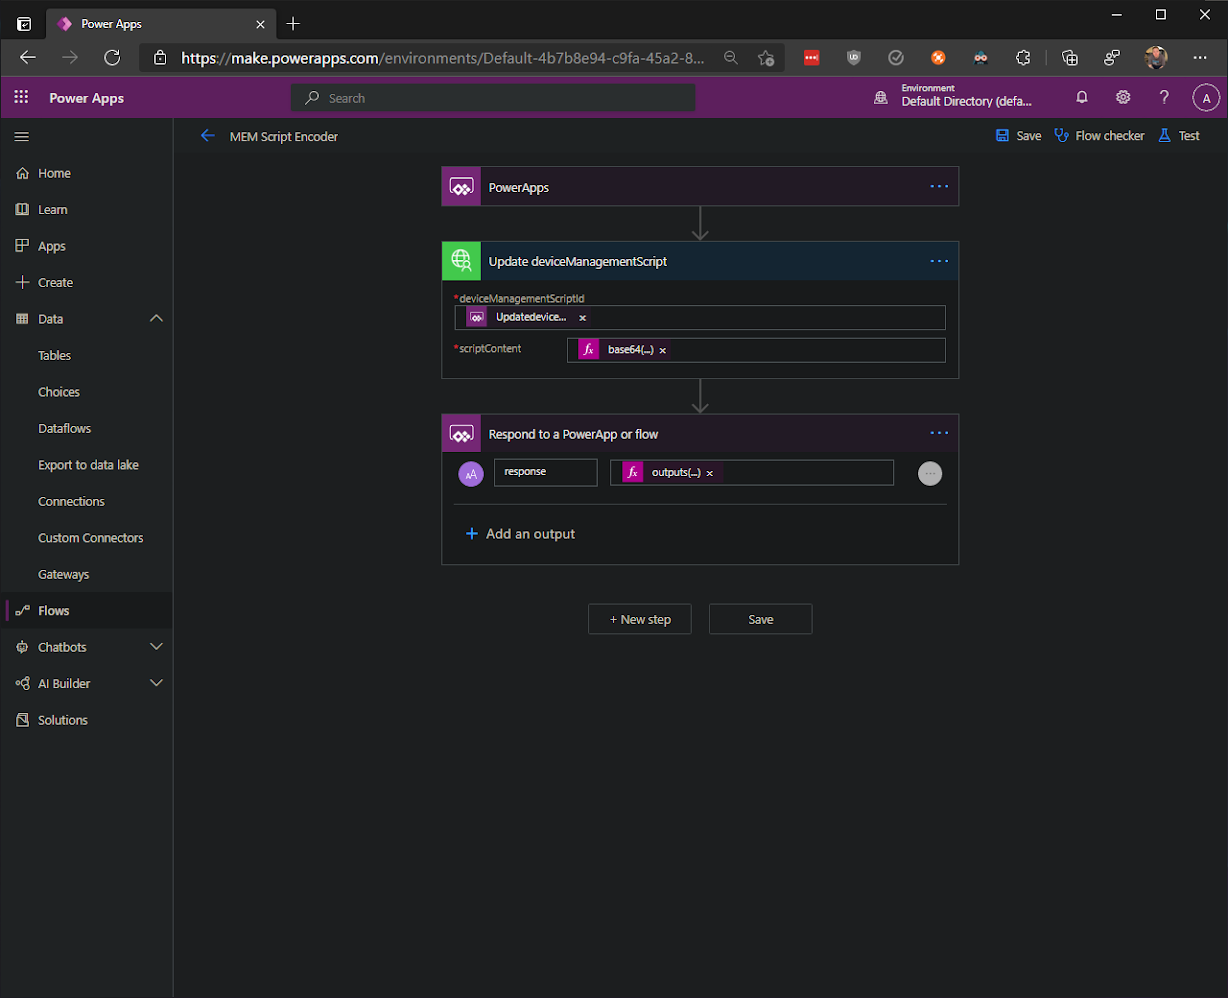
Create a new flow, call it "MEM Script Encoder", select PowerApps for the trigger, and click "Create". Add a new step, select the "MEM Script Helper" custom connector, and select the "Update deviceManagementScript" action. As we did before, select "Ask in PowerApps" for deviceManagementScriptId, and also for scriptContent. You might have to select "See more" in the Dynamic content window for the second "Ask in PowerApps" to show up. This is enough to get the plain text back from the app but we need to convert it to Base64 before the Graph request.
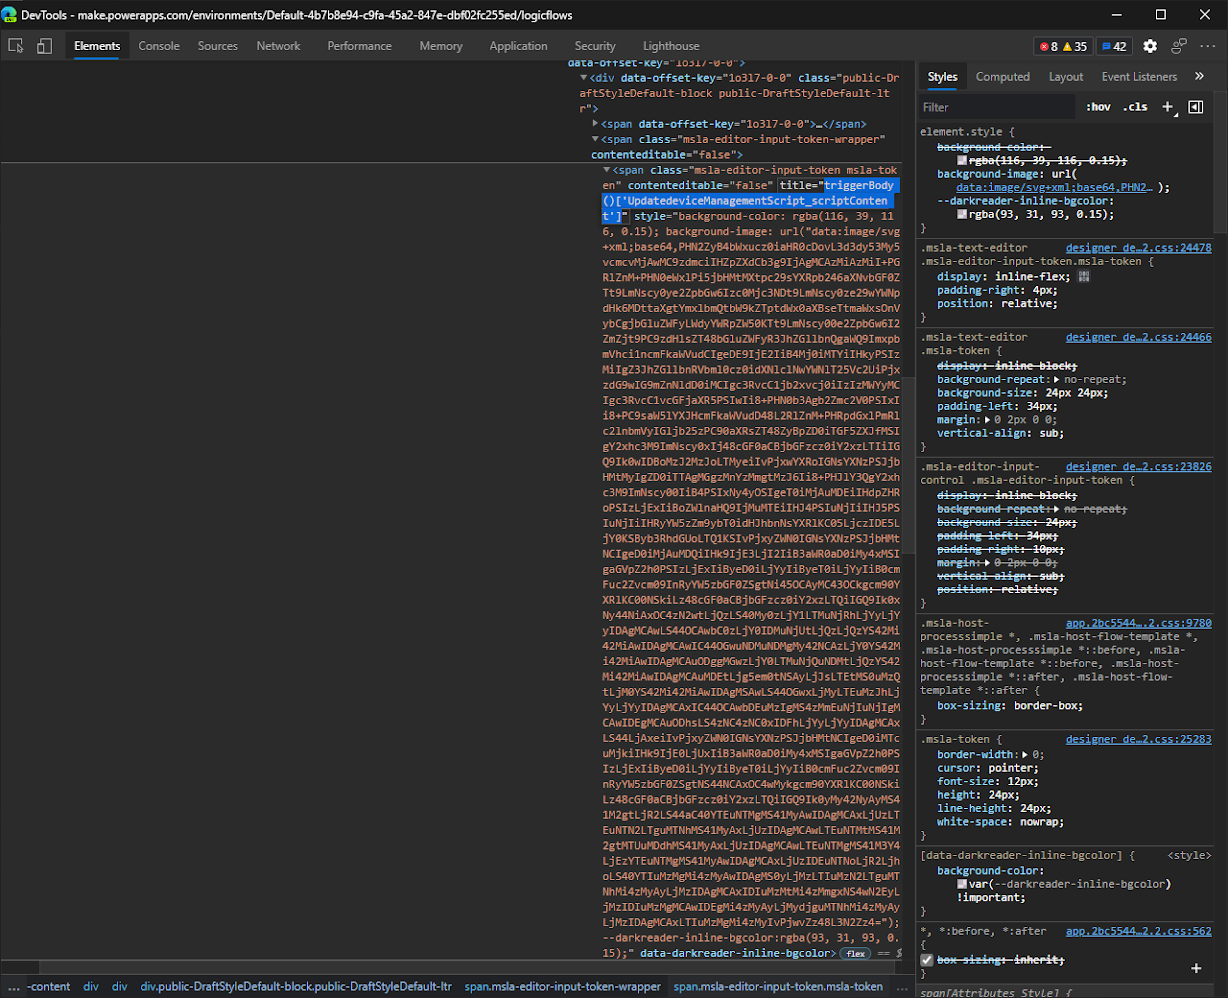
If you hover your mouse over the Dynamic Content in the scriptContent input, you'll be able to see the expression that's used. Or another little trick is to right click on it and "Inspect" it, then find the title in the HTML and copy it from there. We then need to wrap that expression in "base64()" to end up with the complete expression of "base64(triggerBody()['UpdatedeviceManagementScript_scriptContent'])".
Add another step and select "Respond to a PowerApp or flow". Select text as the type of output and make "response" the title and "outputs('Update_deviceManagementScript')" as the value. Now let's save and test.
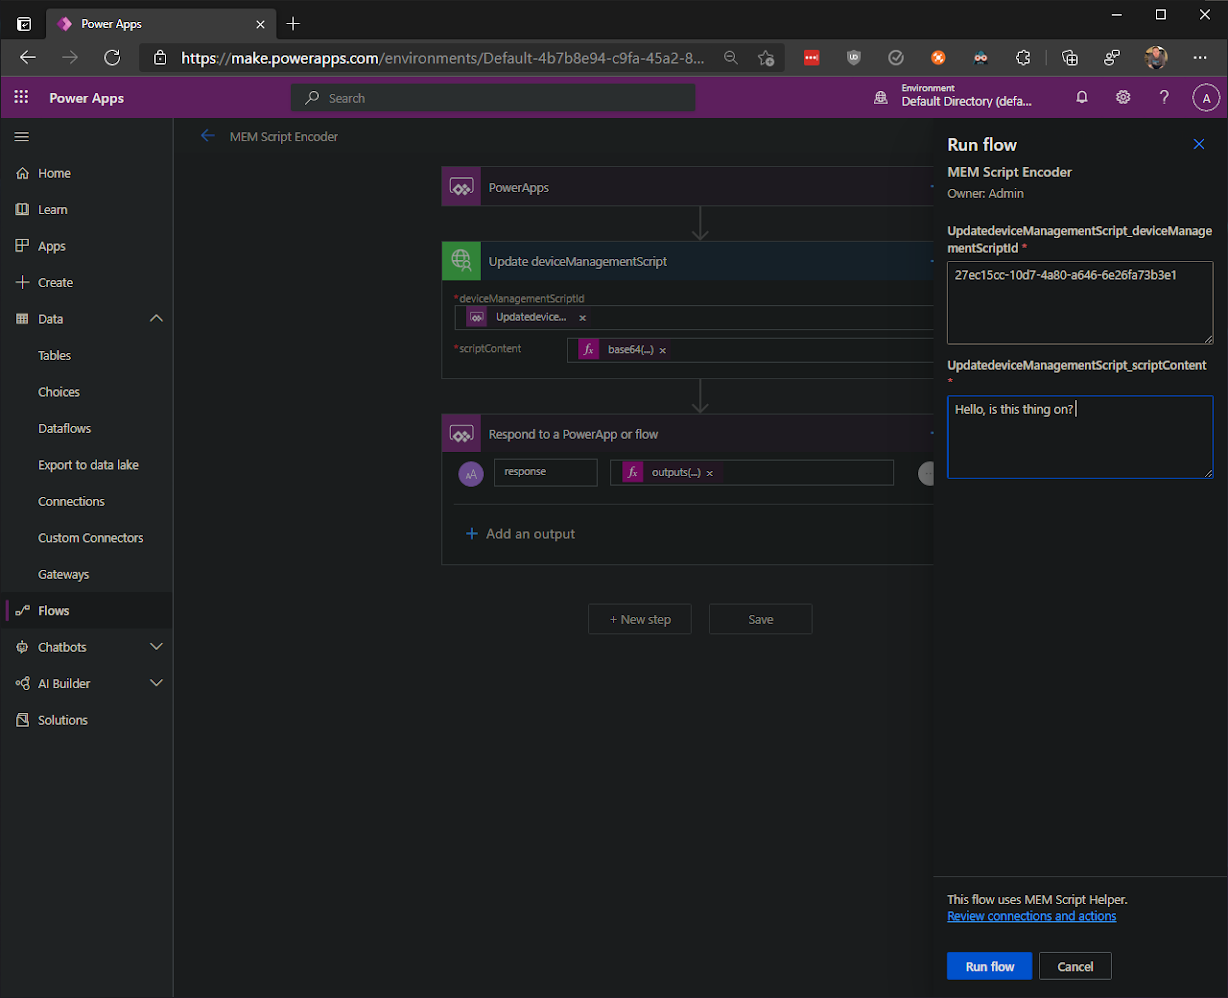
For the test, select Manually, add the ID of the script, and use any text in the scriptContent field and run the test. This will change the script if successful so please make sure you're not doing this on a production script. If successful, we should again see a "Your flow ran successfully." status message.
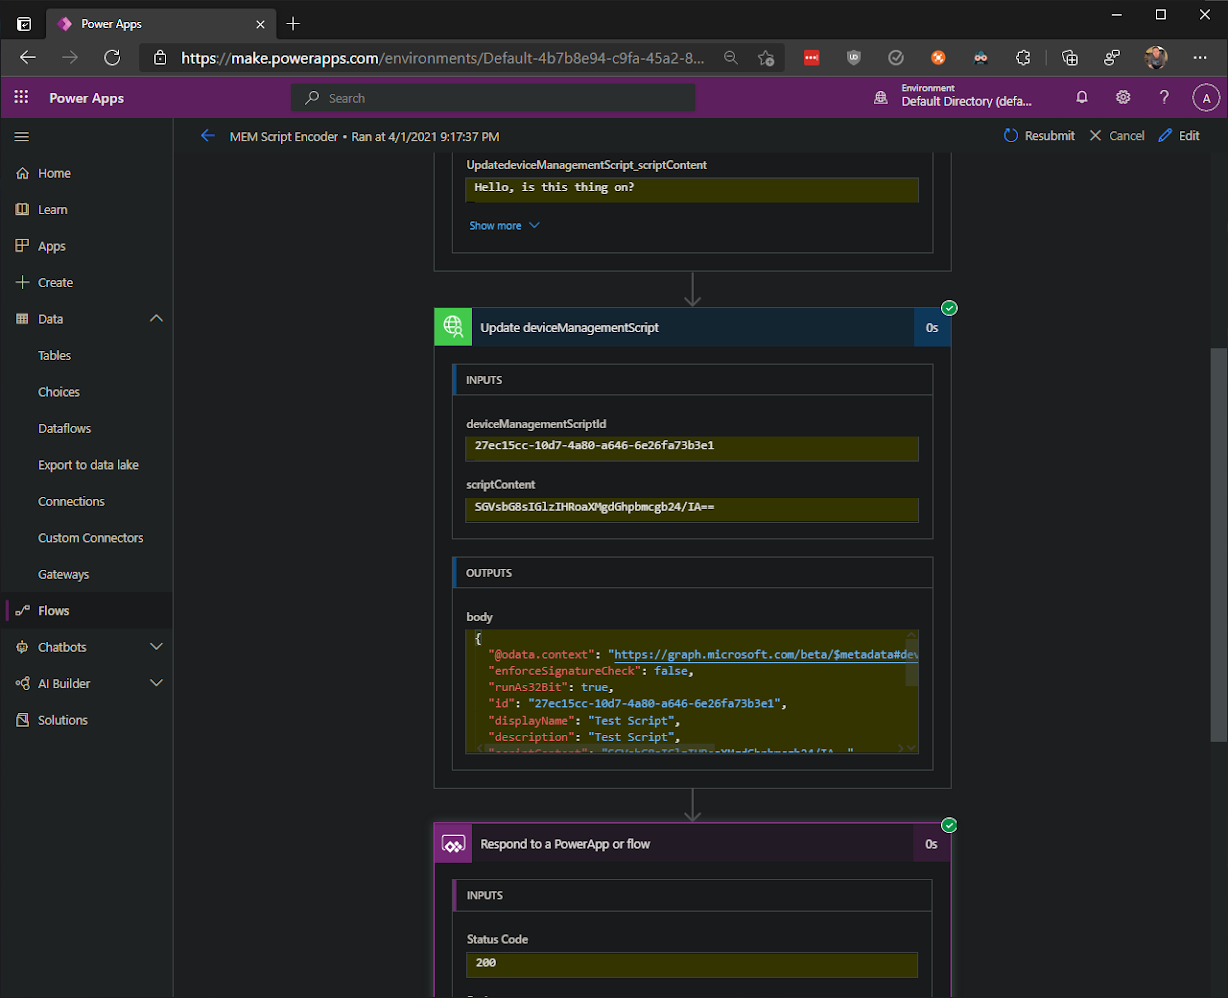
In the results of the test, expand the actions to see the details. You can see that in the first step, plain text was outputted to the second step where it was then converted to base64 before the Graph request. And in the third step, you can see that we get a status code of "200" returned.
We now have the framework built and can finally make the Power App!
Power App
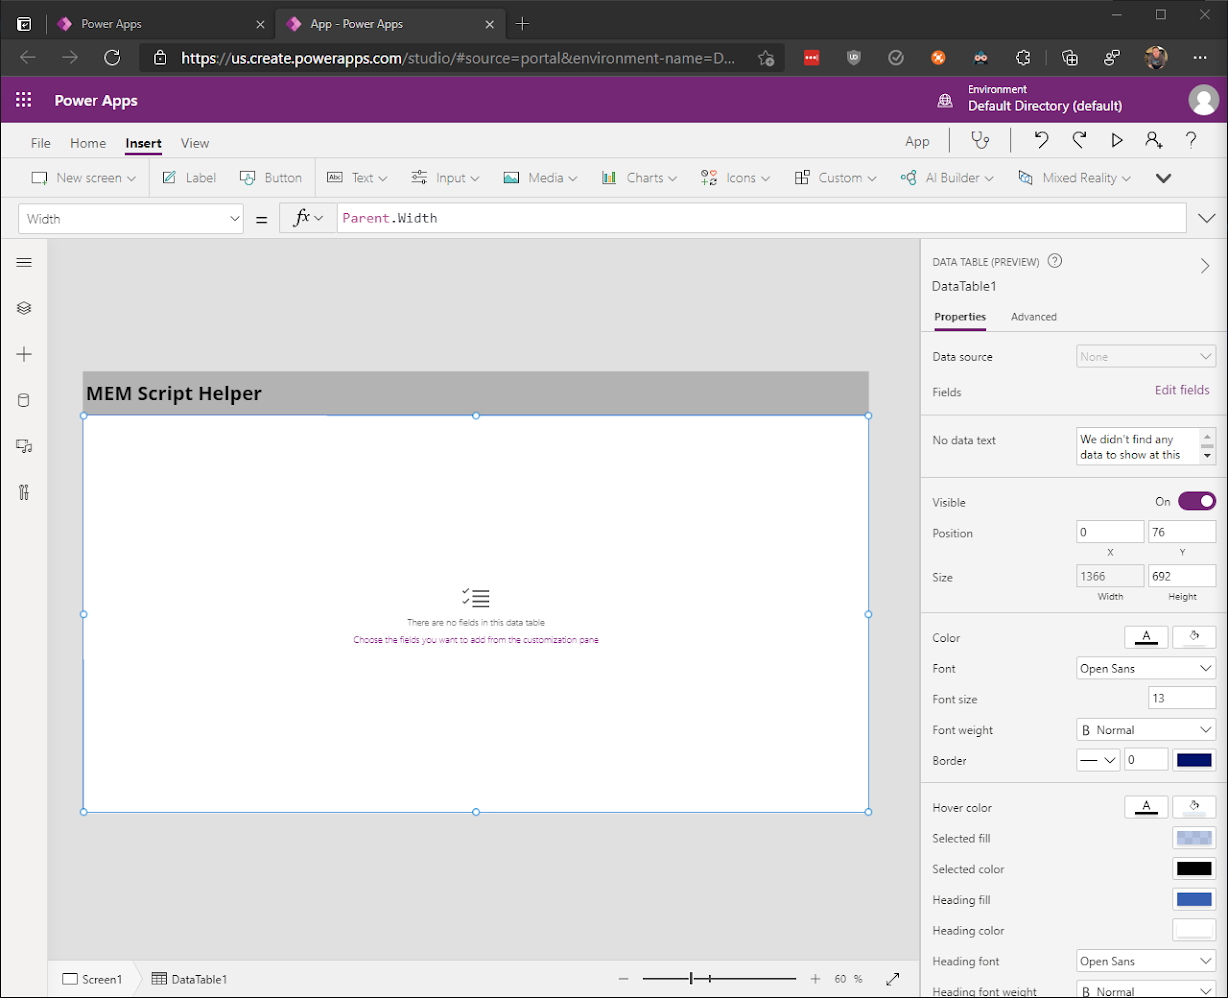
Back in Power Apps, open the App blade and create a new canvas app. We'll use a blank app in tablet layout. The first thing I like to do when creating a new app is add everything that will be the same from screen to screen. In this case, it's just going to be a simple header.
Really, you can go crazy here. For the sake of this blog, I'm keeping it very simple and sticking with a lot of defaults and not using formulas for the sizing and positioning.
Go to the Insert tab and insert a Text label and add the title you'd like to use. I'm using "MEM Script Helper", increasing the size to 25, making it bold, and filling it with another color.
Now insert a Data table and in the "Select a data source" window, expand Connectors, and select "MEM Script Helper", and select the connection. Next to Items, you'll see "MEMScriptHelper" in the function bar. Move your curser to the end, type a ".", and you'll see the three actions that are in that connector. Click "GetDevicemanagementScripts", add the closing parenthesis, and then add ".value" to the end. Move the table so that it's under the header and stretch it fill the screen.
In the data table's properties, click on Edit fields, then add the fields you'd like displayed. I'm going to use displayName, description, lastModifiedDateTime, createdDateTime, and fileName. The table should now be populated with those columns and their values but we need to modify a few things to make it more user friendly.
The first thing to do is sort the results by their display names. To do that, select the table and we'll wrap the Items expression in "SortByColumns" so you end up with "SortByColumns(MEMScriptHelper.GetDeviceManagementScripts().value,"displayName")" for the expression. Then let's change the column headers to not be camelCase text.
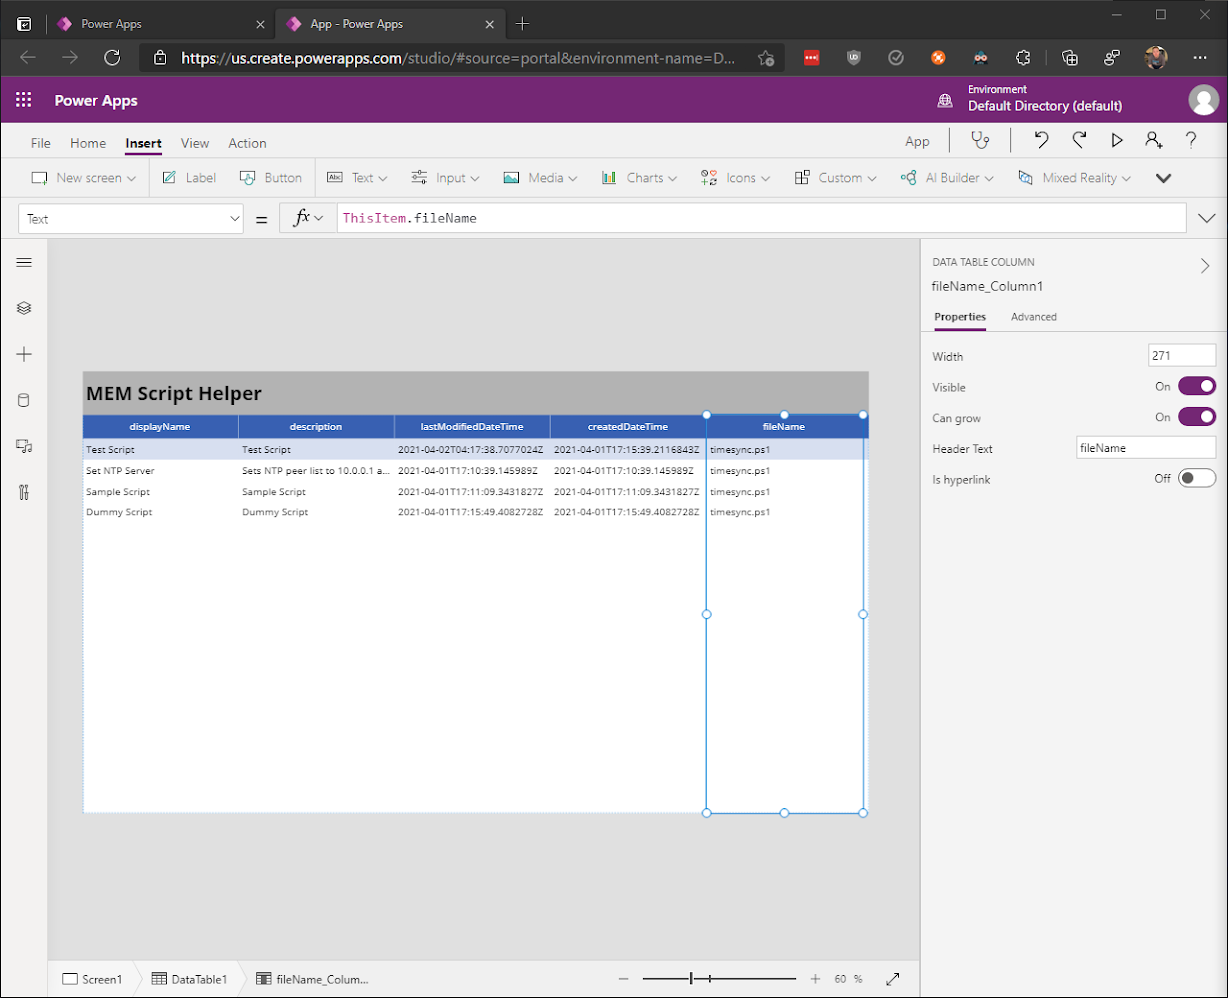
Select each column, and modify their "Header Text" properties to be more readable. And for the cherry on top, let's modify the dates and times to be more easily readable as well.
Select the last modified column, and wrap the Text function in "DateTimeValue()" to end up with DateTimeValue(ThisItem.lastModifiedDateTime). Do the same for the created column.
Finally, we need to make the display names hyperlinks by selecting the column, and in it's properties, flipping the "Is hyperlink" switch to On.

That's better. Now that we have the first screen completed, let's add our next screen.
Click on New screen and select blank. Duplicate the header by copying the label from Screen1 to Screen2. Now in the Insert tab, select Icons, and find a shape you want to use for your back button and drop it on the right side of the header. In the "OnSelect" property, delete "false" and add "Navigate(Screen1)" so when a user clicks it, they are brought back to the first screen.
On this page, we'll be displaying the results returned from our "MEM Script Decoder" flow and the details of the script.
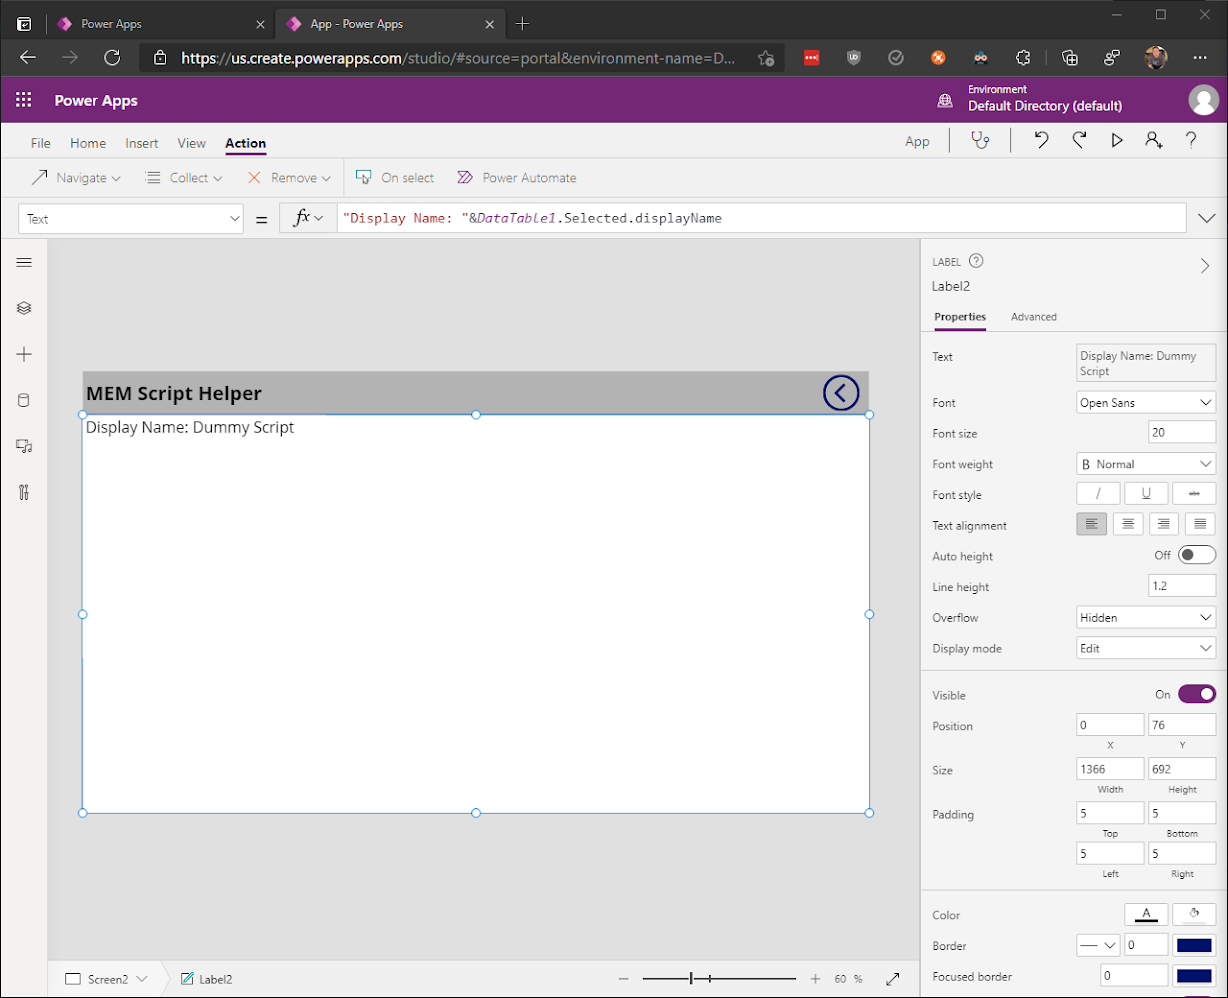
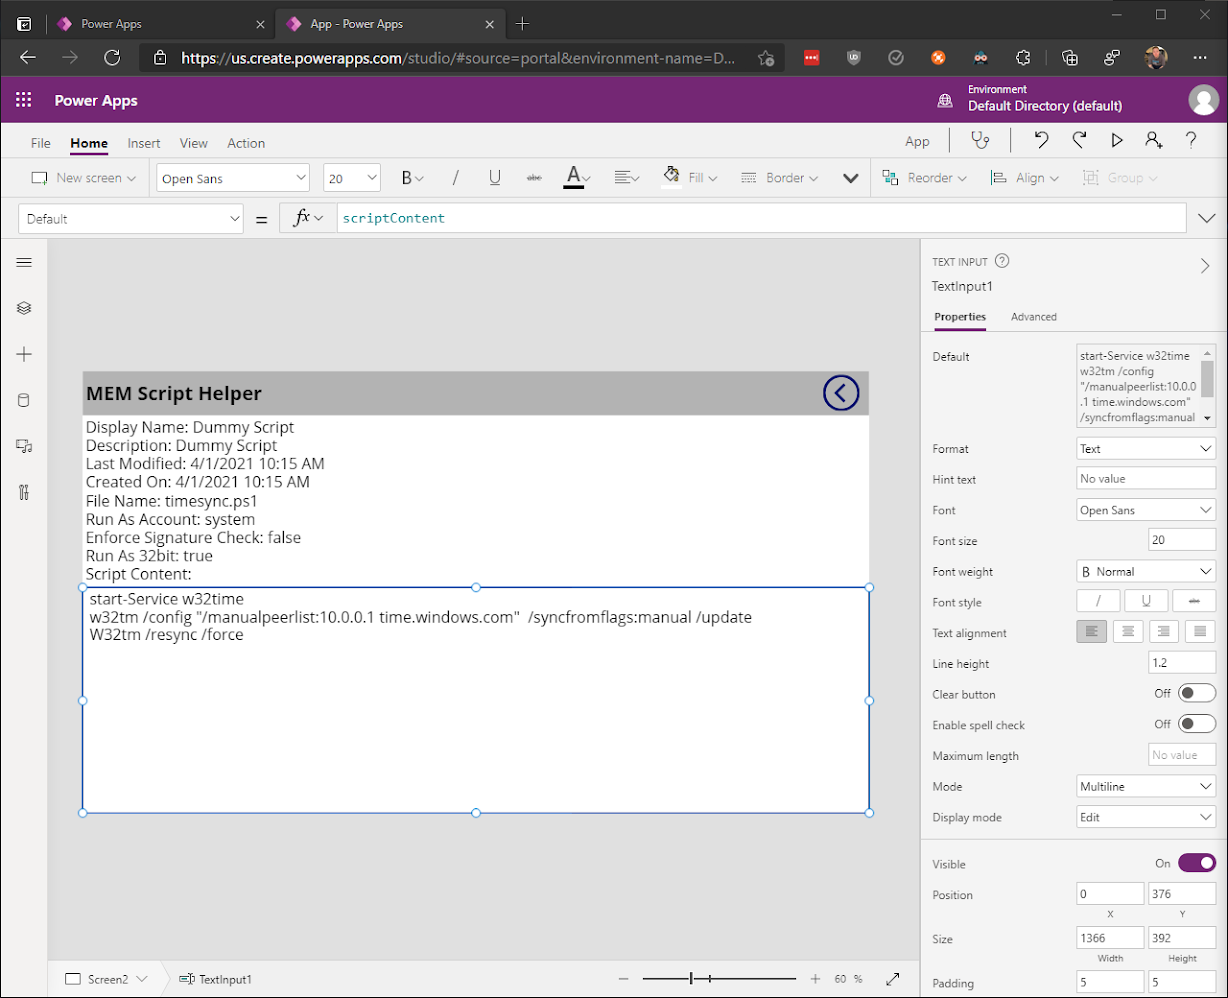
First, insert a label. Move it under the header and stretch the width to fill the screen, and turn on Auto height in the properties. Change the Vertical align property to be "Top" and increase the font size a bit. In the Text property, add "Display Name: " (include the quotes so the function knows this is a string) followed by "& DataTable1.Selected.DisplayName". What should be displayed on the screen is "Display Name: ScriptName".
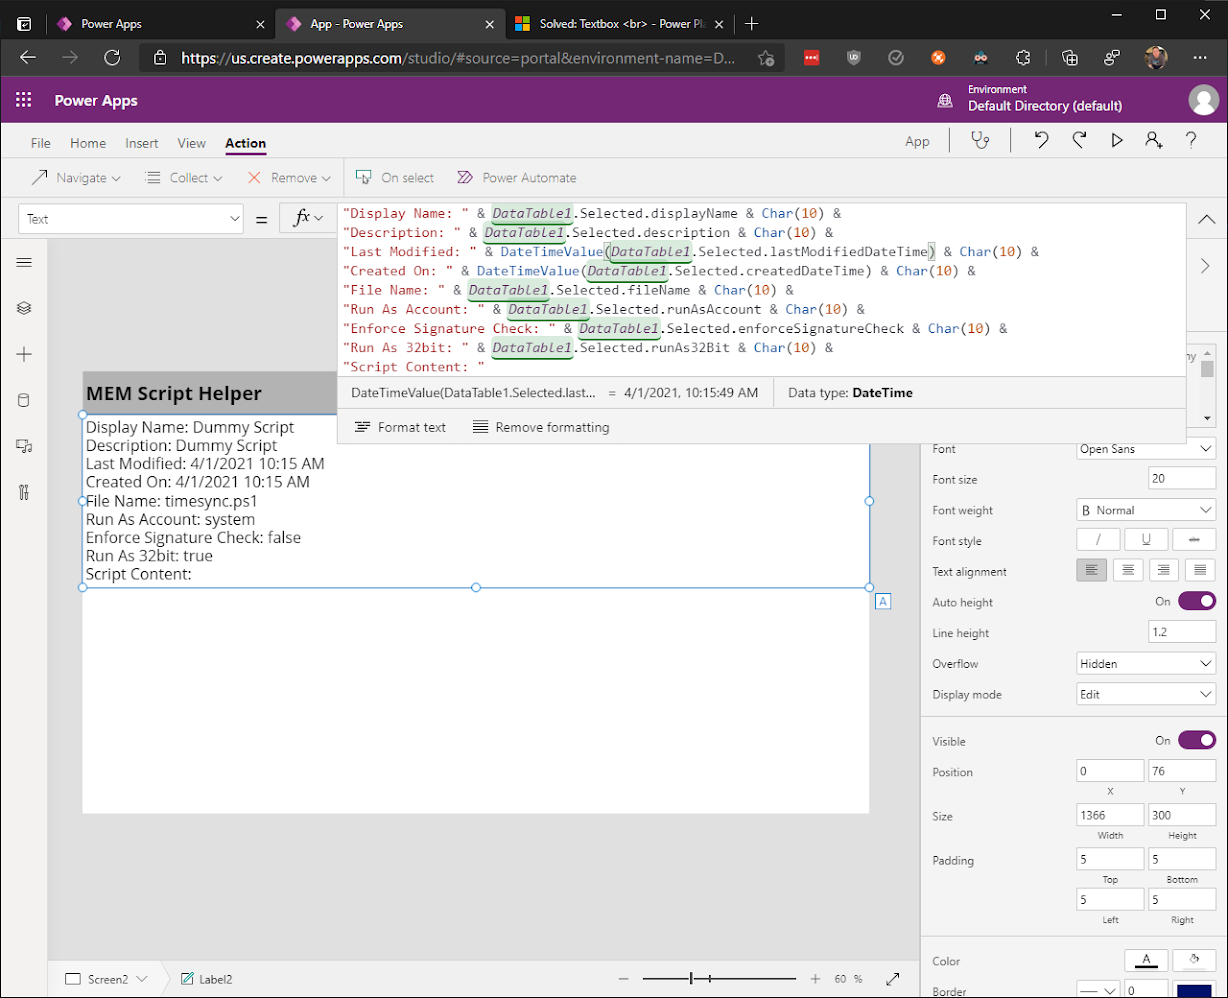
Instead of creating a new label for every property that we want listed here, let's add them to the same label and separate them using new lines. To do this, add another "&" to the end of the function followed by "Char(10)" (this is the character code for a new line), and then another "&". Then we can repeat the first steps and do this for every line we want added except for script content, which will only be the string since the table doesn't actually contain the script content. Don't forget to wrap your date values in "DateTimeValue()".
Now the fun part! Insert a "Text Input", move it under the label we just created, stretch it to fill the rest of the page, change the font size to match the label, and change the mode to Multiline.
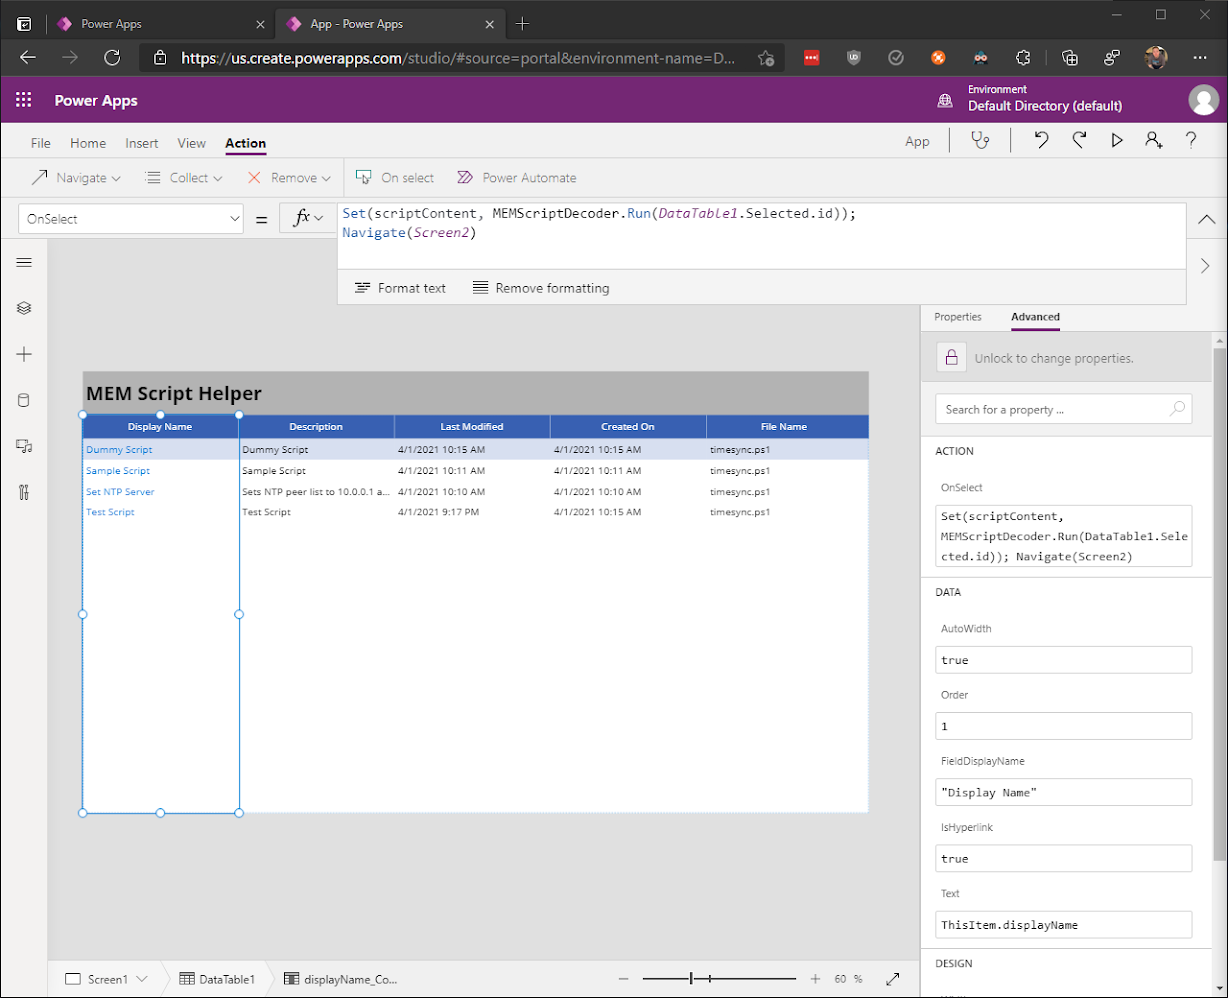
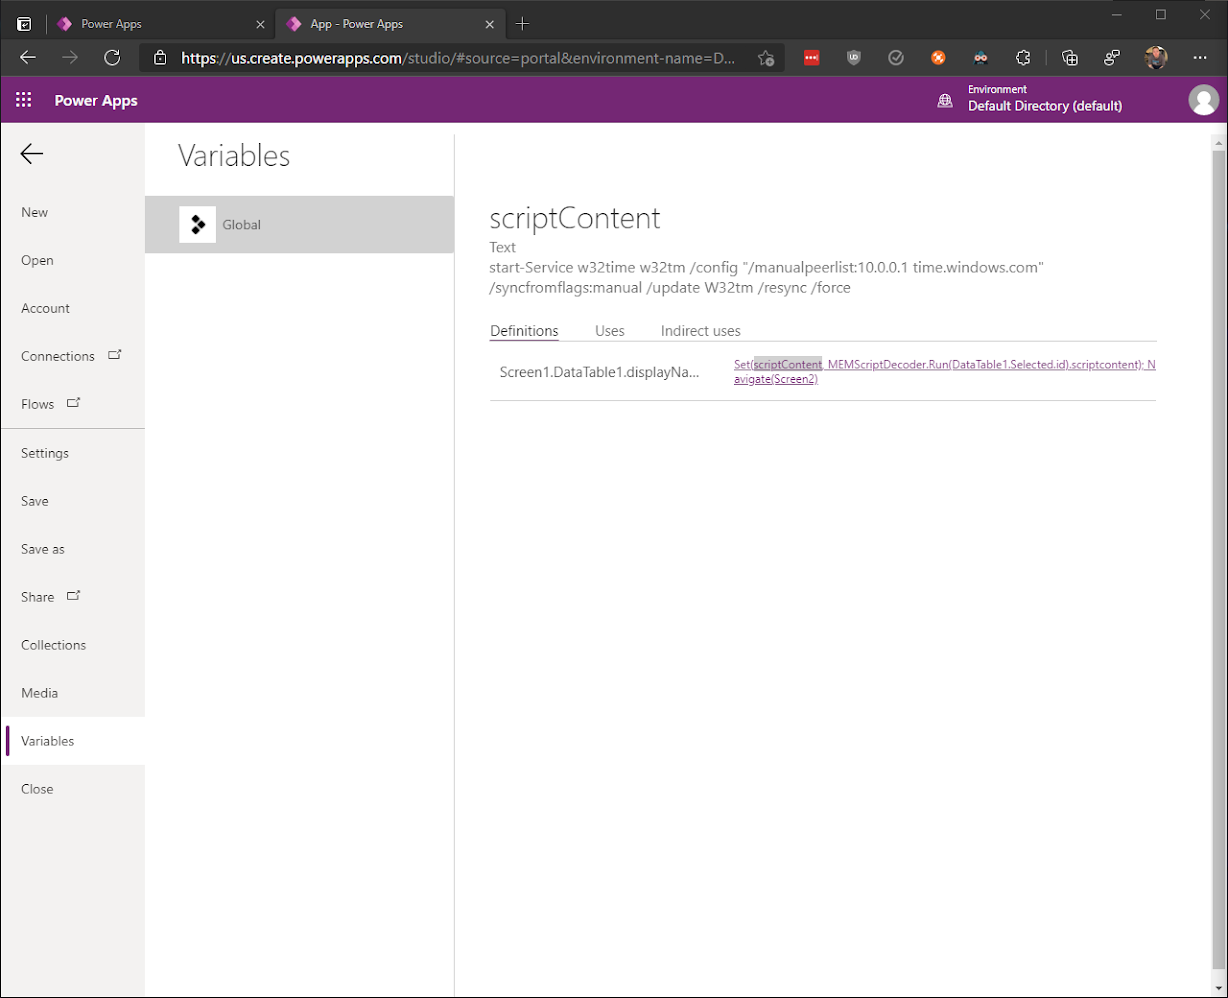
Now we need to go back to Screen1, select the Display Name column, and select the "OnSelect" property. Clear the value from the function bar and in the Action tab, select Power Automate, and pick "MEM Script Decoder". Then we'll need to change the function to "Set(scriptContent, MEMScriptDecoder.Run(DataTable1.Selected.id).scriptcontent);". This will create a variable called "scriptContent" with the decoded script content returned from our MEM Script Decoder flow. We'll also want to add "Navigate(Screen2)".
Let's test it just to make sure everything is still working as planned by holding the Alt key which will let you use the app as a mini-preview. This should take you to the second screen and we can check the variable by going to File, Variables, and selecting the variable.
Now we can go back to screen 2 and add the variable to TextInput1's Default property. Now the script content should be visible in the text input.
The next thing we need to do is add a button that will use our MEM Script Encoder flow update the script. To do this, insert a button, place it where you'd like, and change the text the "Update Script". Now on the "OnSelect" property, remove the value from the function, in the Action tab, select Power Automate, and choose the MEM Script Encoder flow. We need to complete the function by adding the id of the selected data table row, and the text from our text input box, and wrap it in a variable. The completed function should read "Set(response,MEMScriptEncoder.Run(DataTable1.Selected.id,TextInput1.Text).response)".
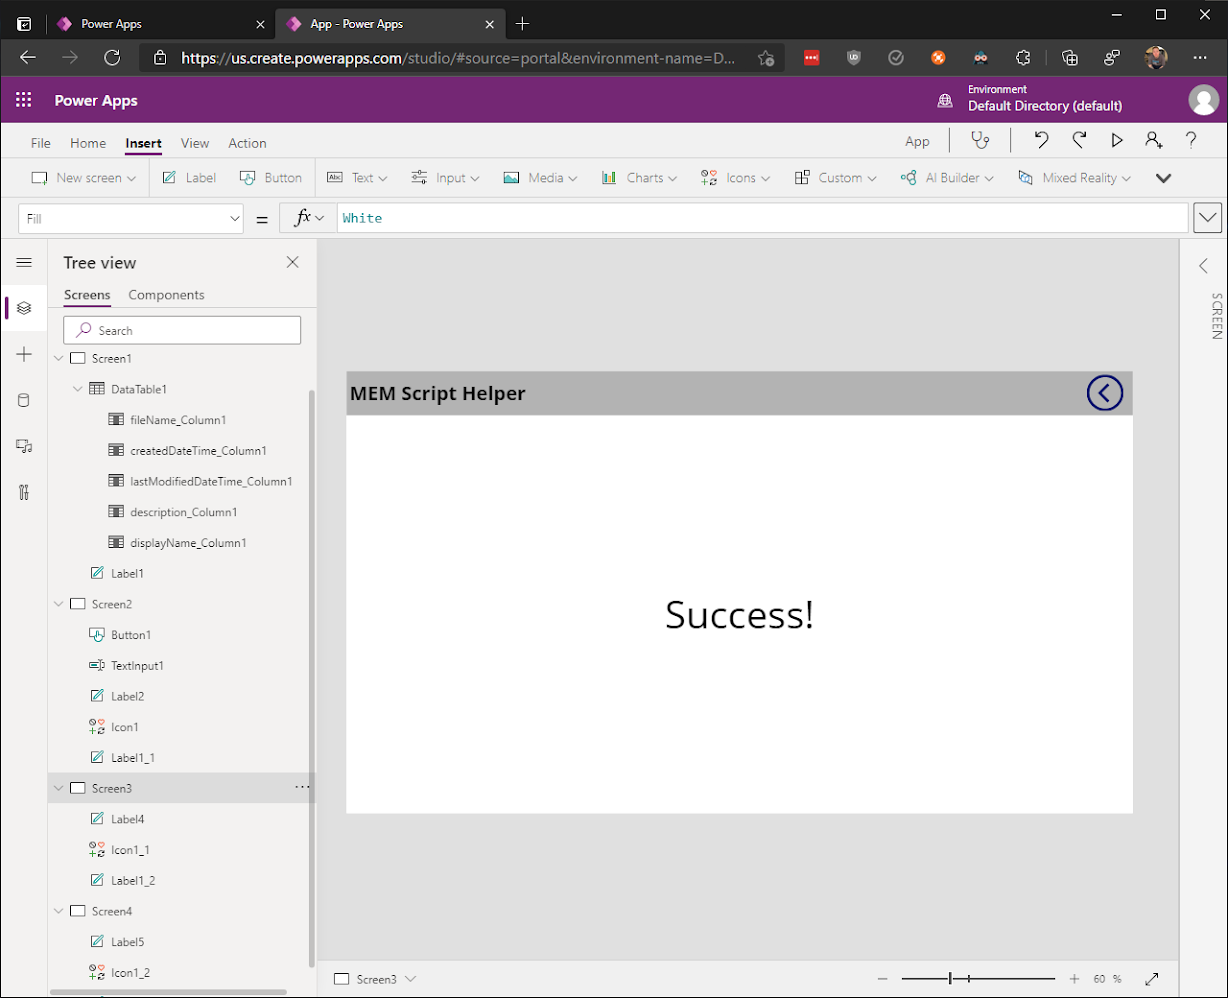
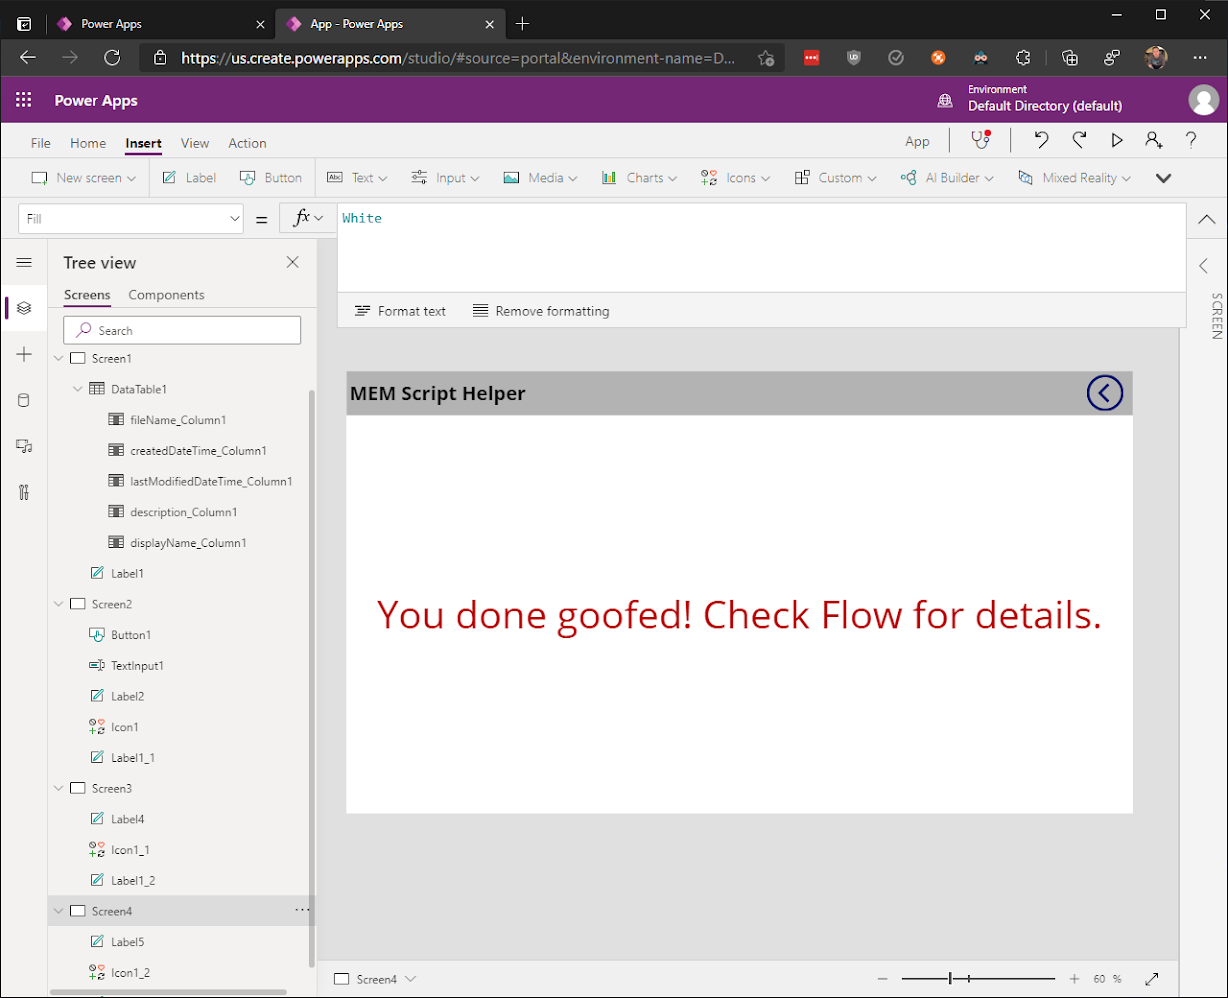
And the last thing we'll need to do is add a little bit of logic that will tell us of the update was successful or not. We're keeping it simple for this. Let's add two new screens. One for the failure message and one for the success message. Copy the header and back icon to both of them. On Screen3, let's add a label, stretch it to fill the screen, increase the font a bunch, and center it. Change the text to "Success!". Do the same on Screen4 but make the text a failure message like "You done goofed! Check Flow for details."
Now back on Screen2, select the Update Script button and add a semi-colon after the Set function, and then the following, "If(IsMatch(response,":200",MatchOptions.Contains),Navigate(Screen3),Navigate(Screen4))". What this is saying is "if response contains ":200" then navigate to screen 3 else navigate to screen 4". We can test it by holding Alt and clicking on it. If successful, we should see our success screen.
We can prove that the failure works as well by removing "DataTable1.Selected.Id" from our button's function and adding "test" instead. If the failure is successful (?), you should see your failure page. And we can go back to our flow, check the run history, and see that it failed because "test" was the value for the script id.
Now change your button's function back to the correct value, save, and publish! From here, you can continue to add features. One of the things I'm thinking of doing is automatically adding a comment block at the top of the script that would contain things like the user that edited it, versioning, filename, and so on. There's no shortage of ideas when it comes to Power Apps and MEM.
This comment has been removed by a blog administrator.
ReplyDeleteThis comment has been removed by a blog administrator.
ReplyDeleteThis comment has been removed by a blog administrator.
ReplyDeleteThis comment has been removed by a blog administrator.
ReplyDeleteThis comment has been removed by a blog administrator.
ReplyDeleteThis comment has been removed by a blog administrator.
ReplyDeleteThis comment has been removed by a blog administrator.
ReplyDelete